


Requirement
– Base Level 125
– Job Level 70
– Allocate all status points
– Maximize all skills
– Check weight: 800
– Unequip Peco Peco, Cart, and Mount/Bird
 Rune Knight
The Rune Knight is a powerful frontline warrior who commands both blade and rune magic. Masters of two-handed swords and dragon riding, Rune Knights excel in close-range combat with devastating physical damage and high survivability. By carving ancient runes, they gain powerful buffs that enhance attack, defense, and utility, allowing them to adapt to any battlefield.
How to Change to Rune Knight
-
Head to the tavern located south of the Prontera East Inn. From the portal, walk south to Prontera (206,156).
-
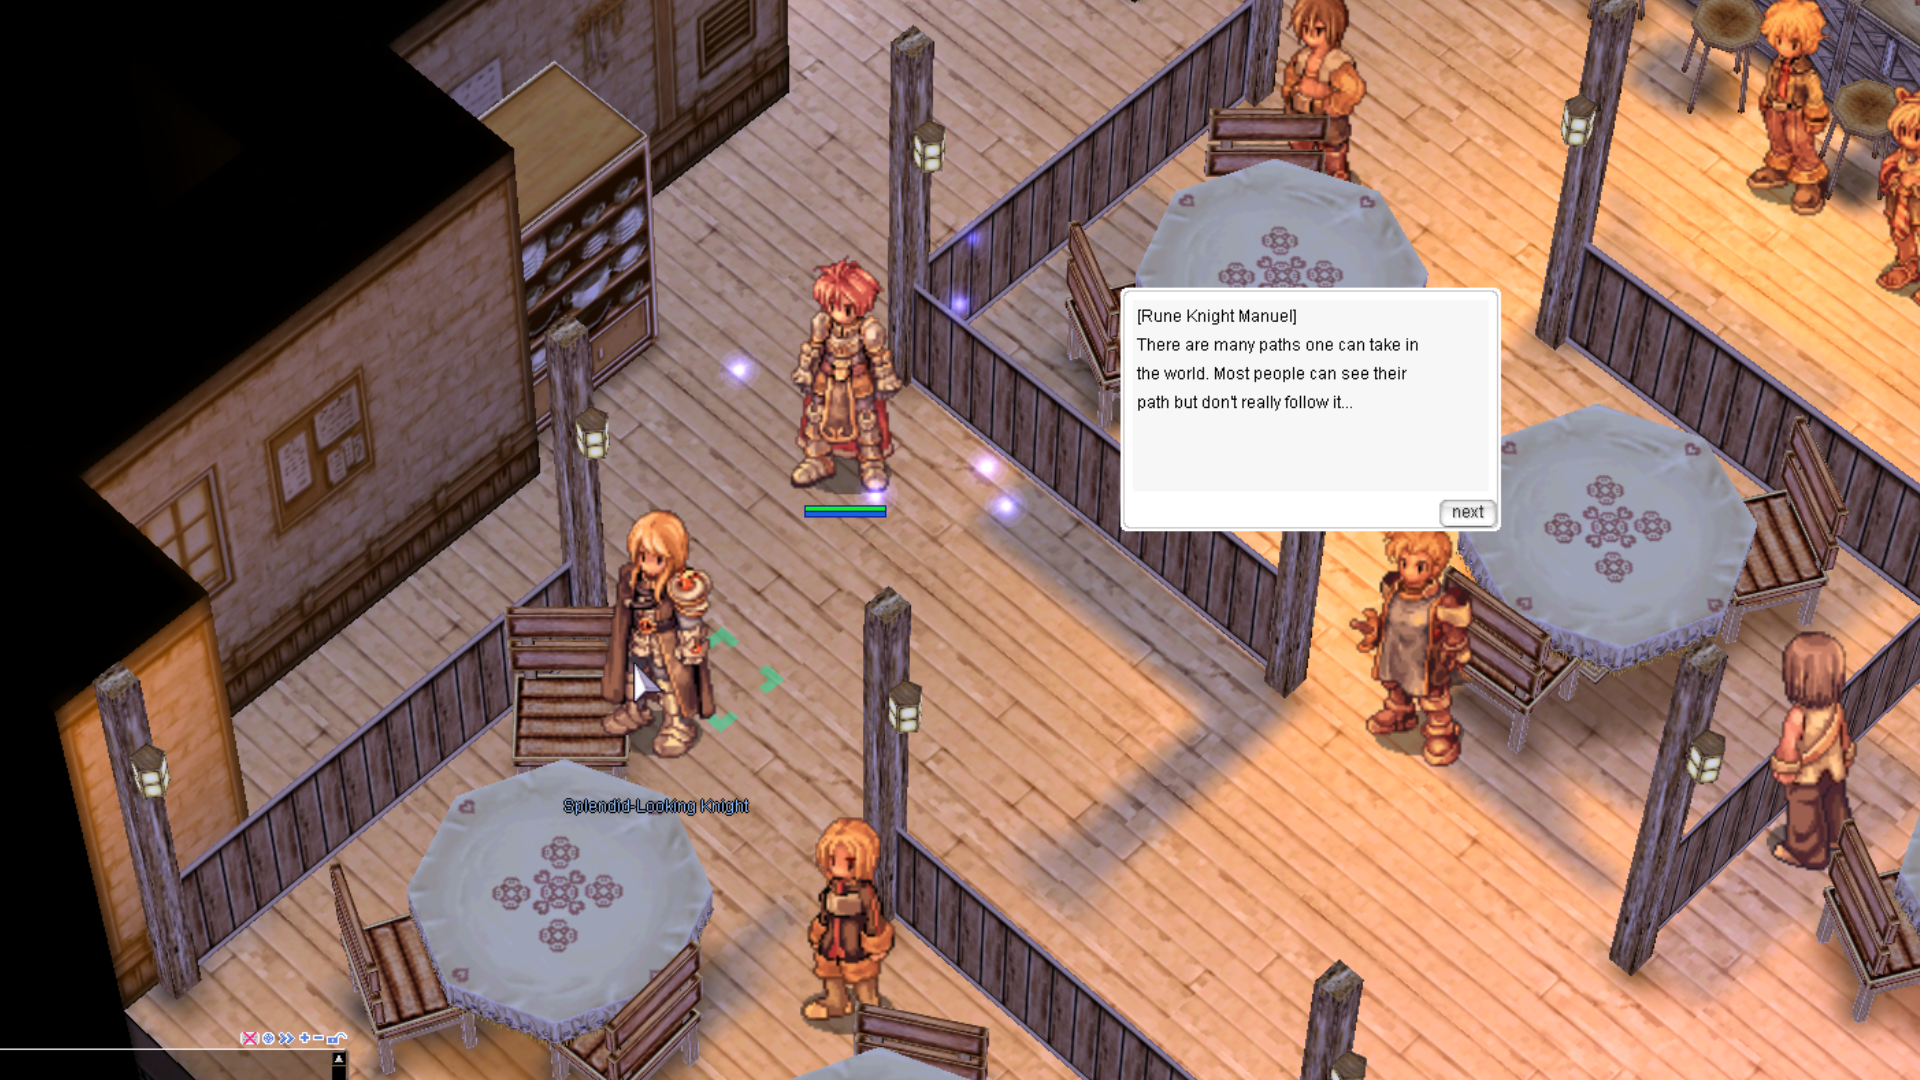
Talk to the Splendid looking Knight at prt_in (164,23).
-
Select “Sure, let’s have a drink.”, then choose “I’m ready to become a Rune Knight.”
-
Travel to Glast Heim and move to the northwestern area of the map.
-
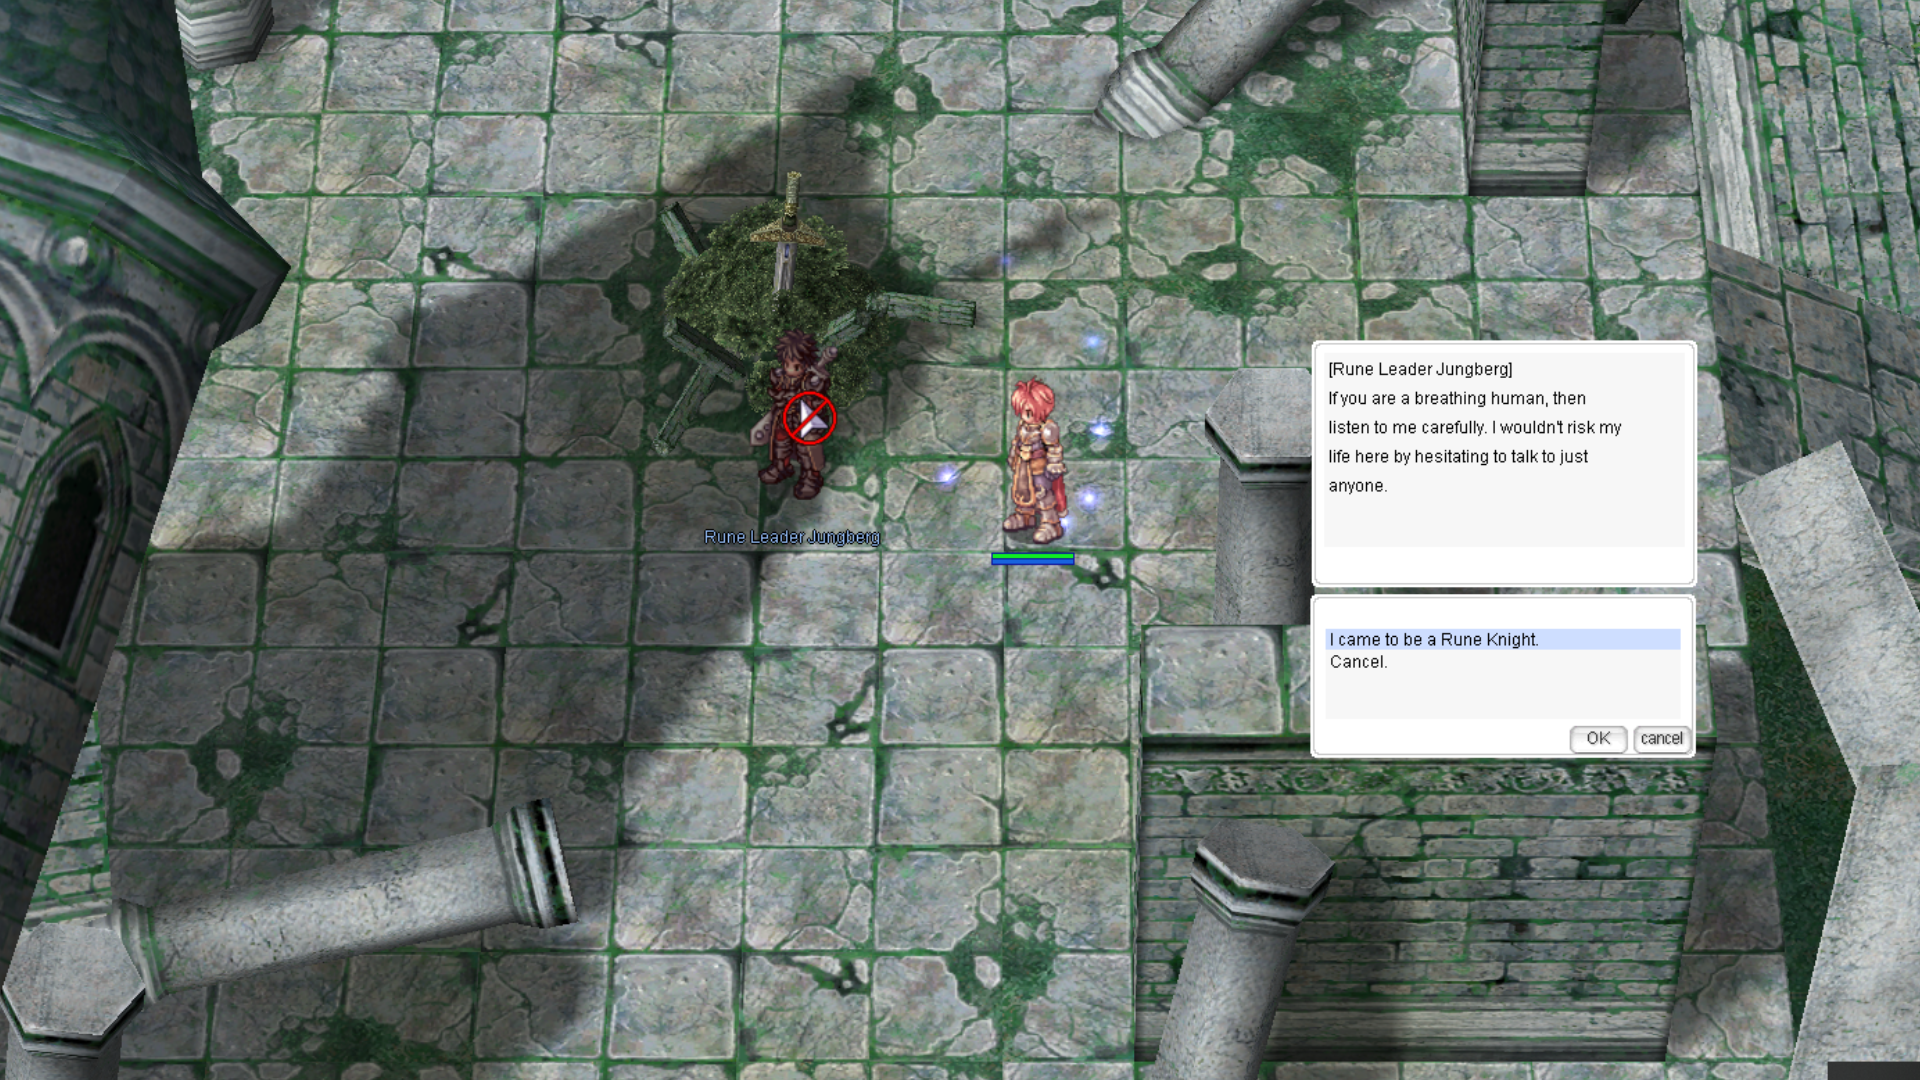
Speak with Rune Leader Jungberg at glast_01 (43,361) and choose “I came to become a Rune Knight.”
-
Proceed to Glast Heim Chivalry, Level 2 at glast_01 (76,193).
-
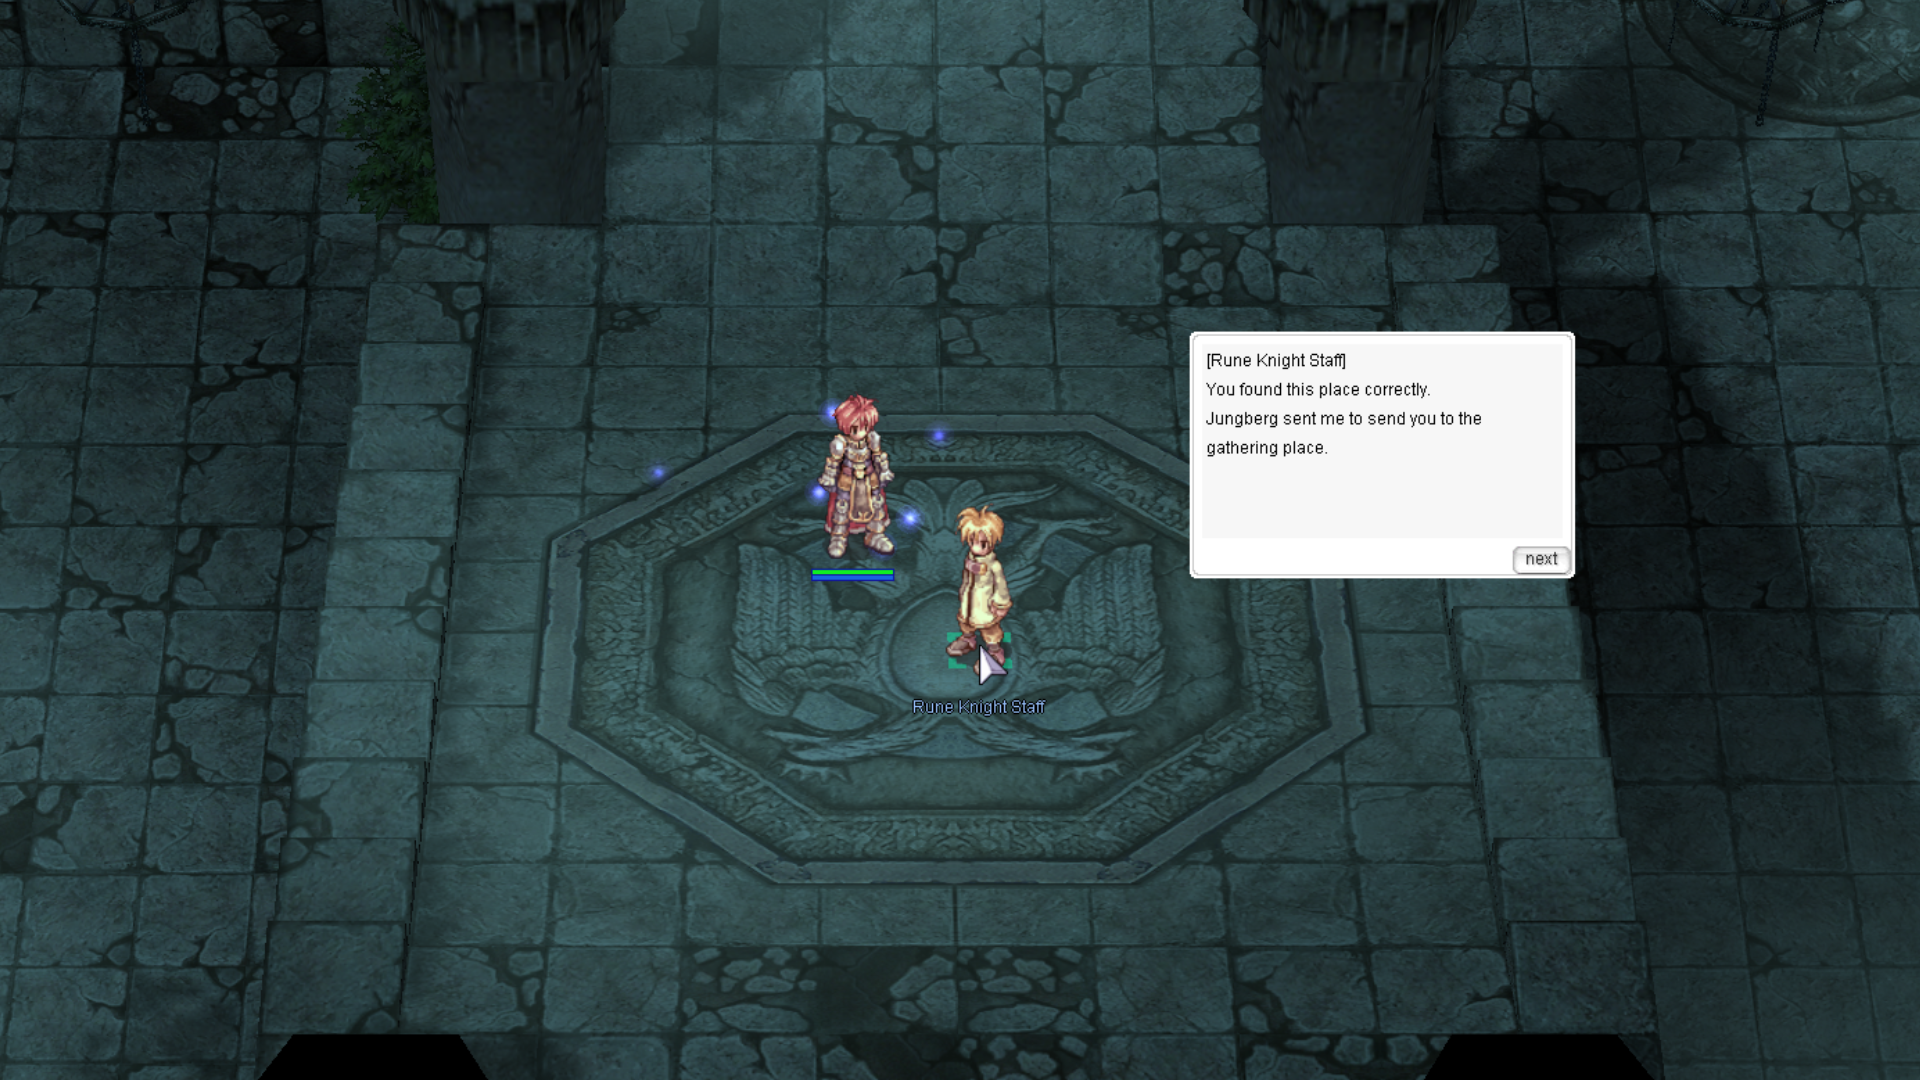
Talk to the Rune Knight Staff at gl_knt02 (144,53), located slightly south of the map’s center. You will be teleported to the Rune Knight gathering hall.
-
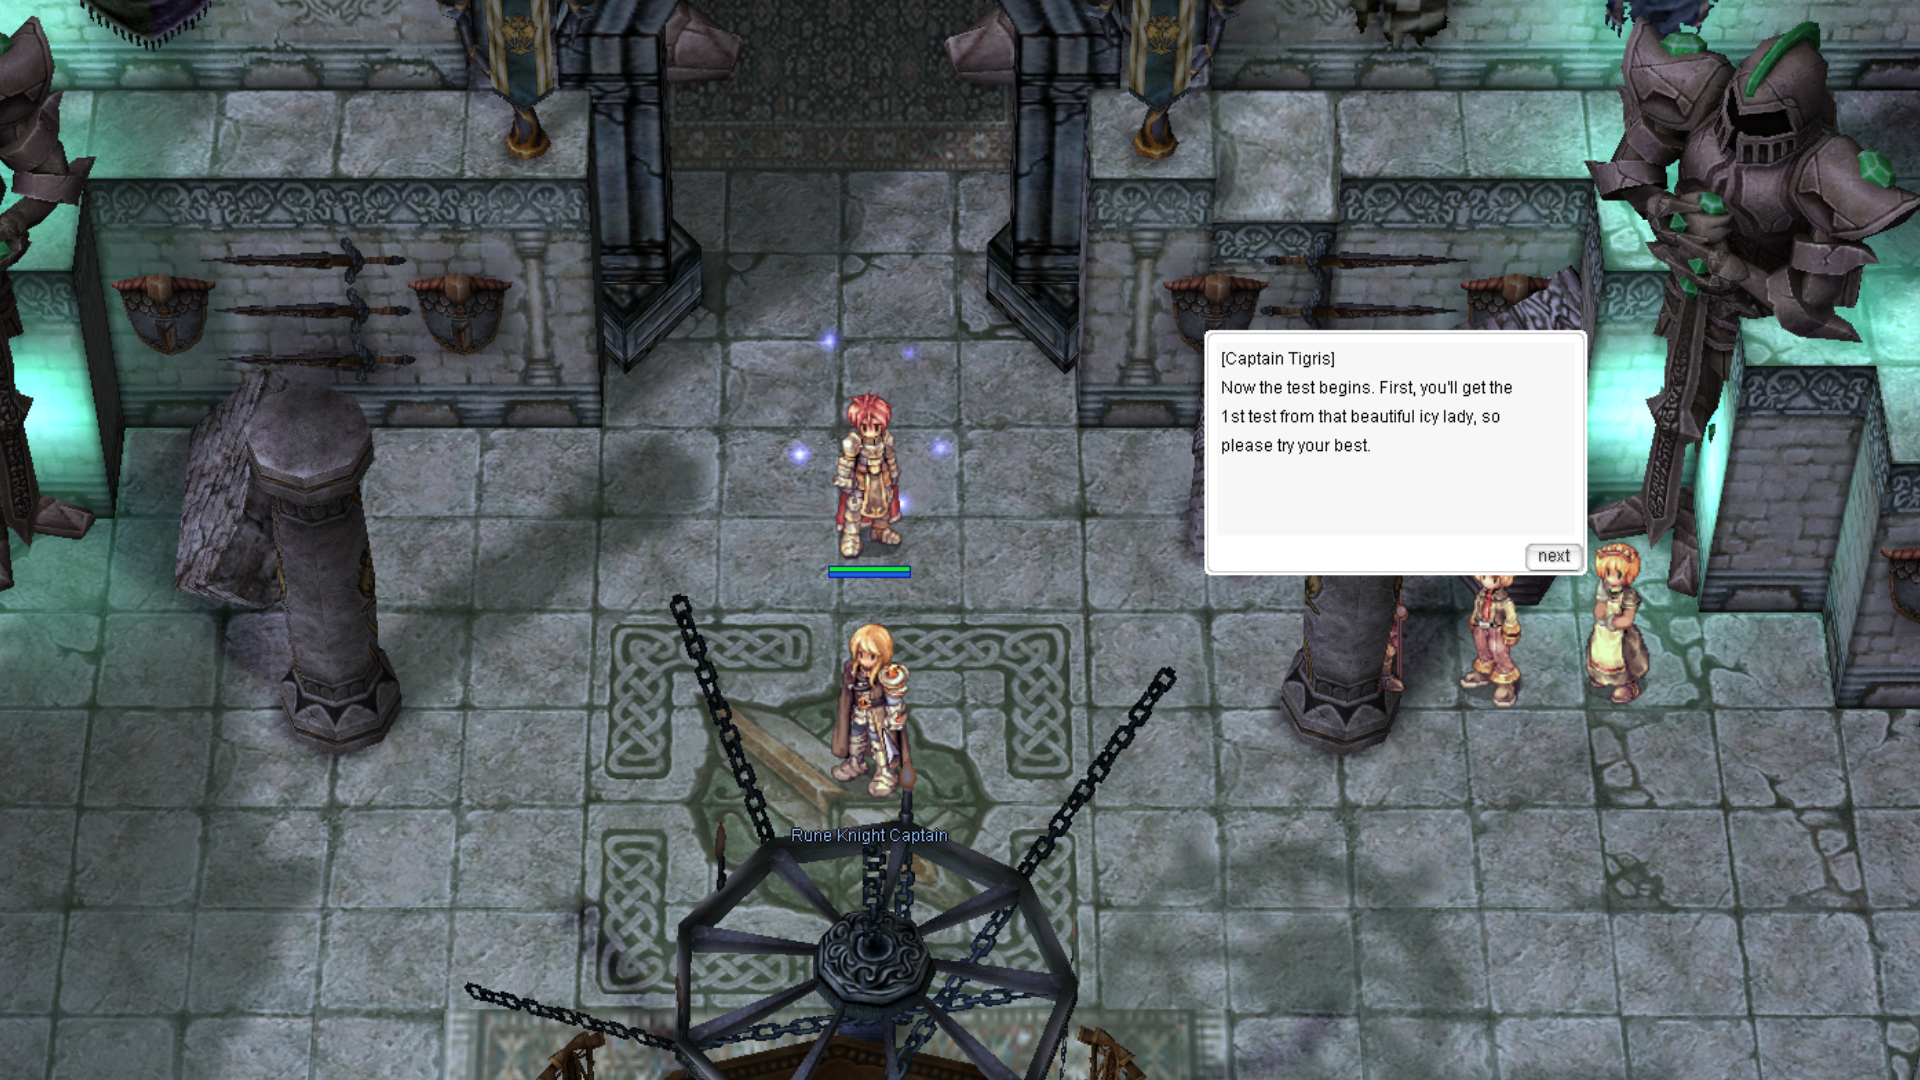
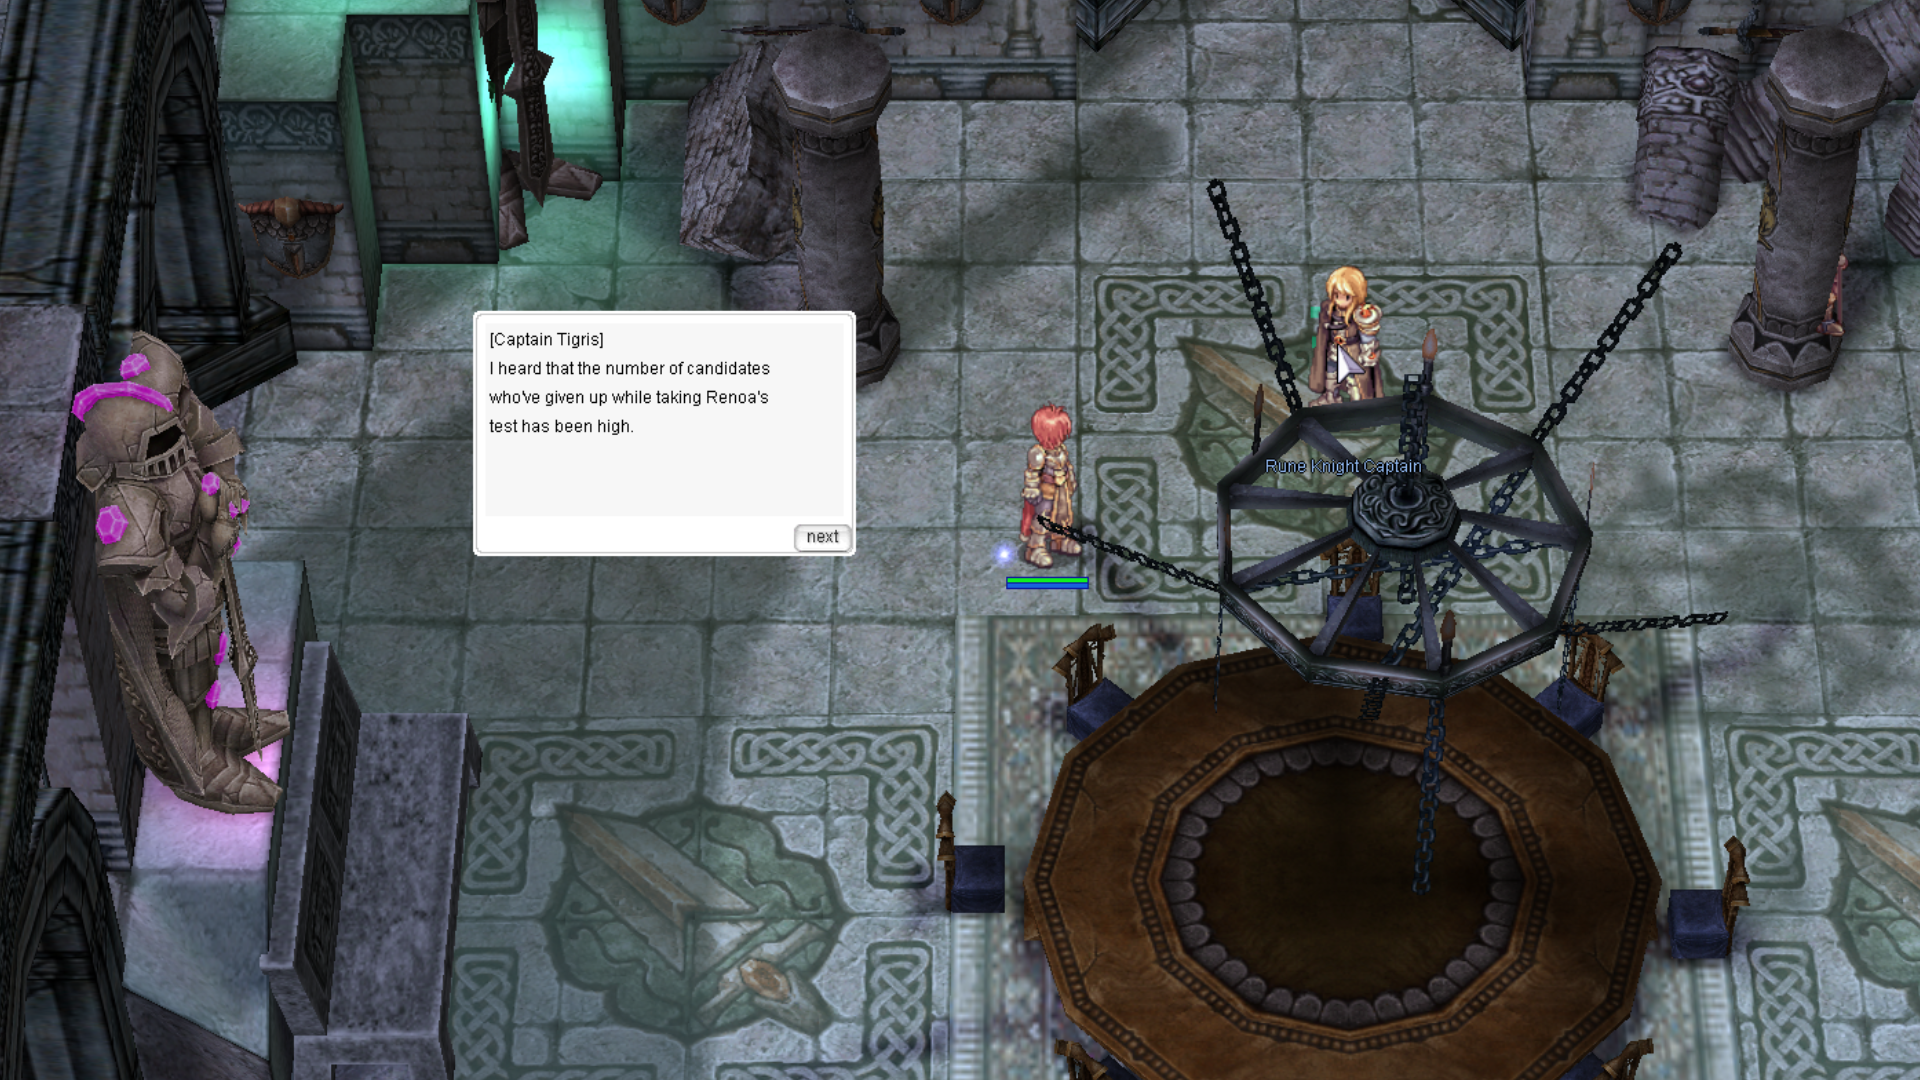
Upon arrival, speak with the Rune Knight Captain at job_rune01 (81,60).
-
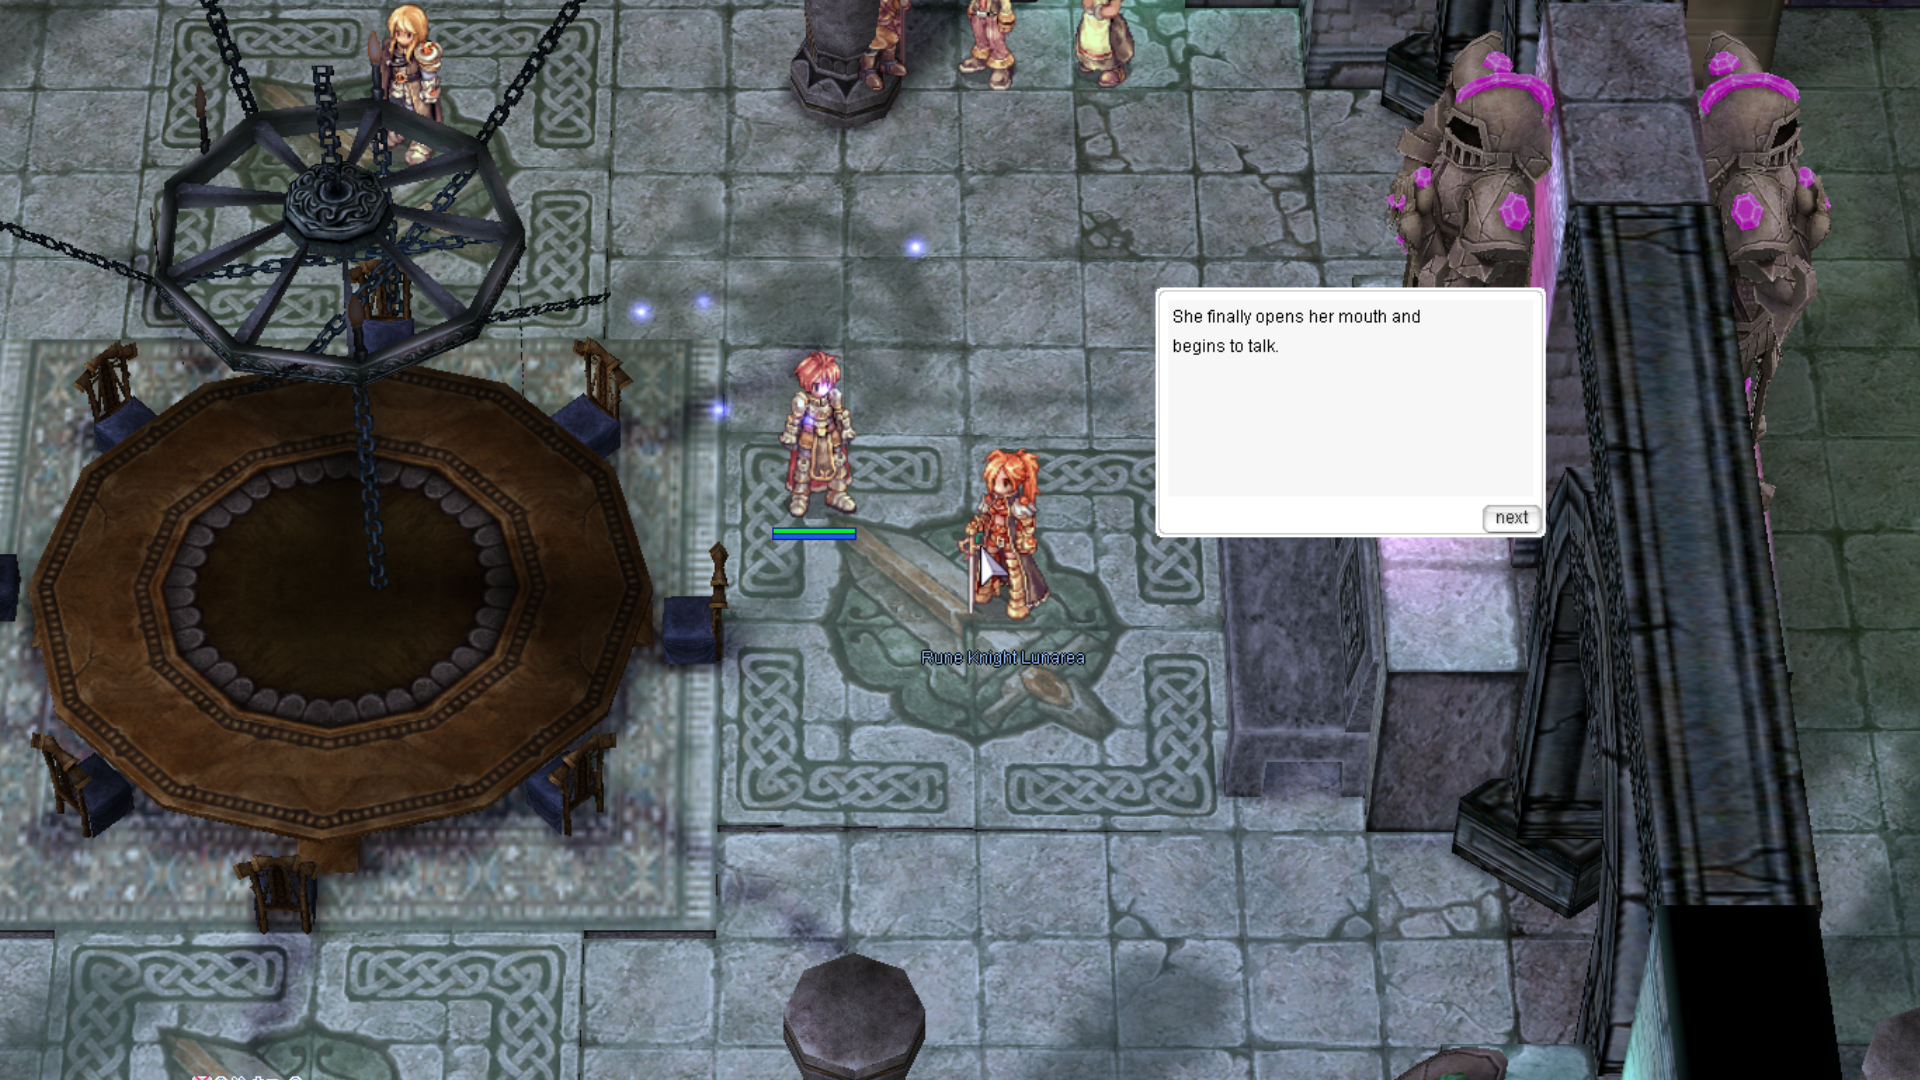
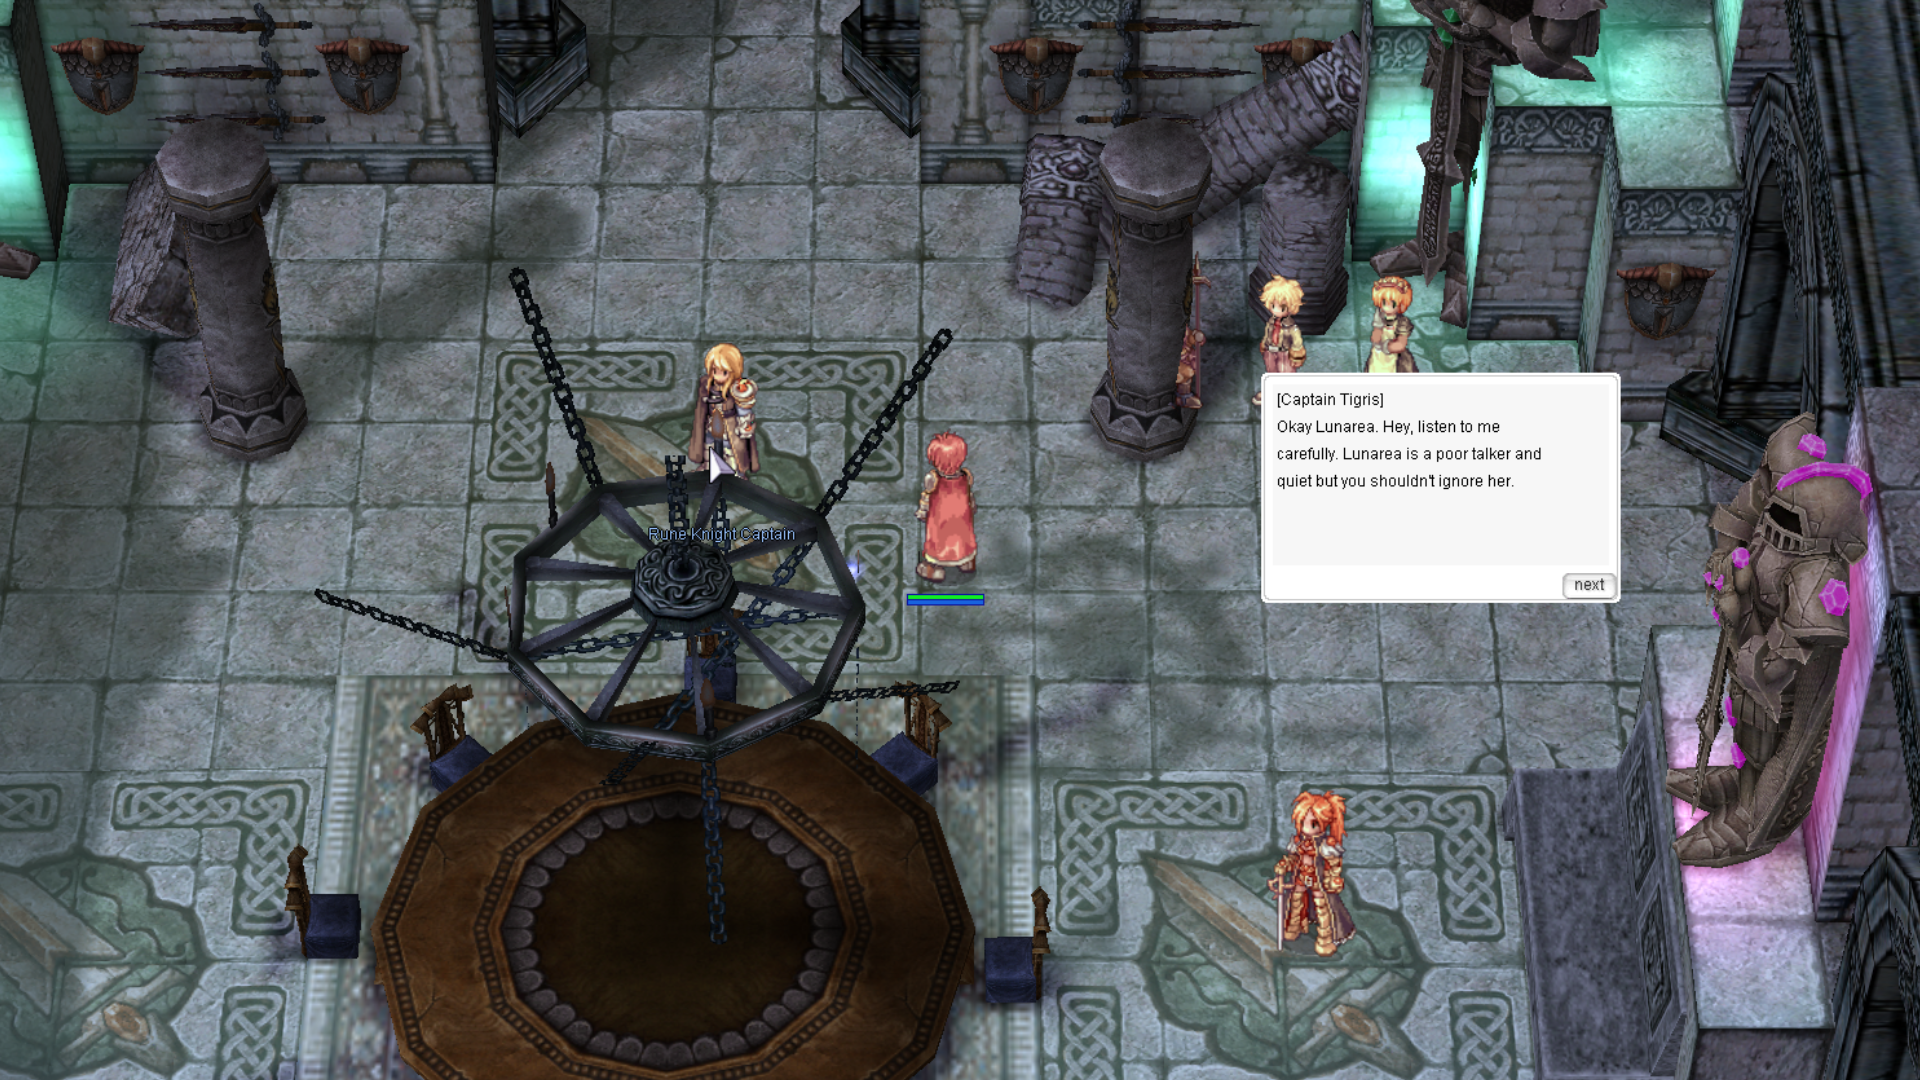
Find Rune Knight Lunarea at job3_rune01 (89,50) to the southeast. Tell her you are ready for the test, she will approve you without one.
-
Return to the Rune Knight Captain and speak with him again.
-
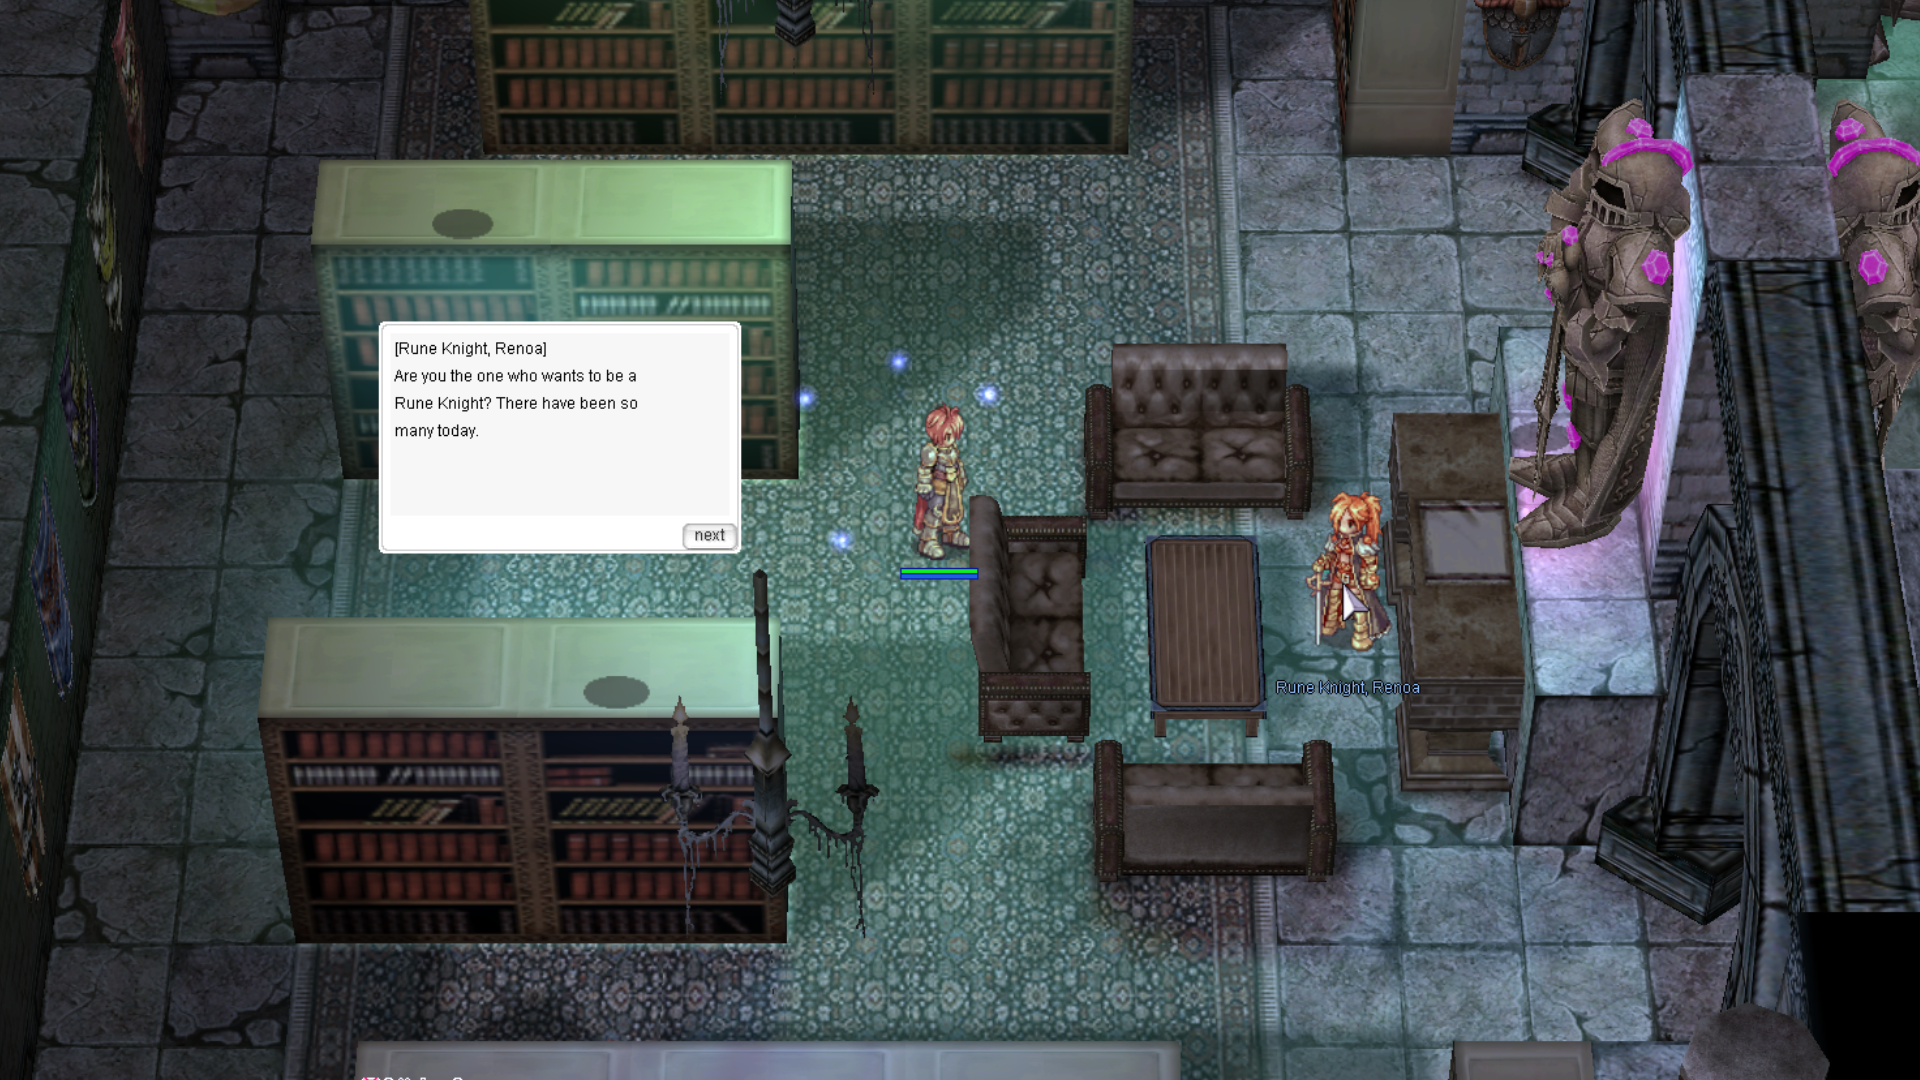
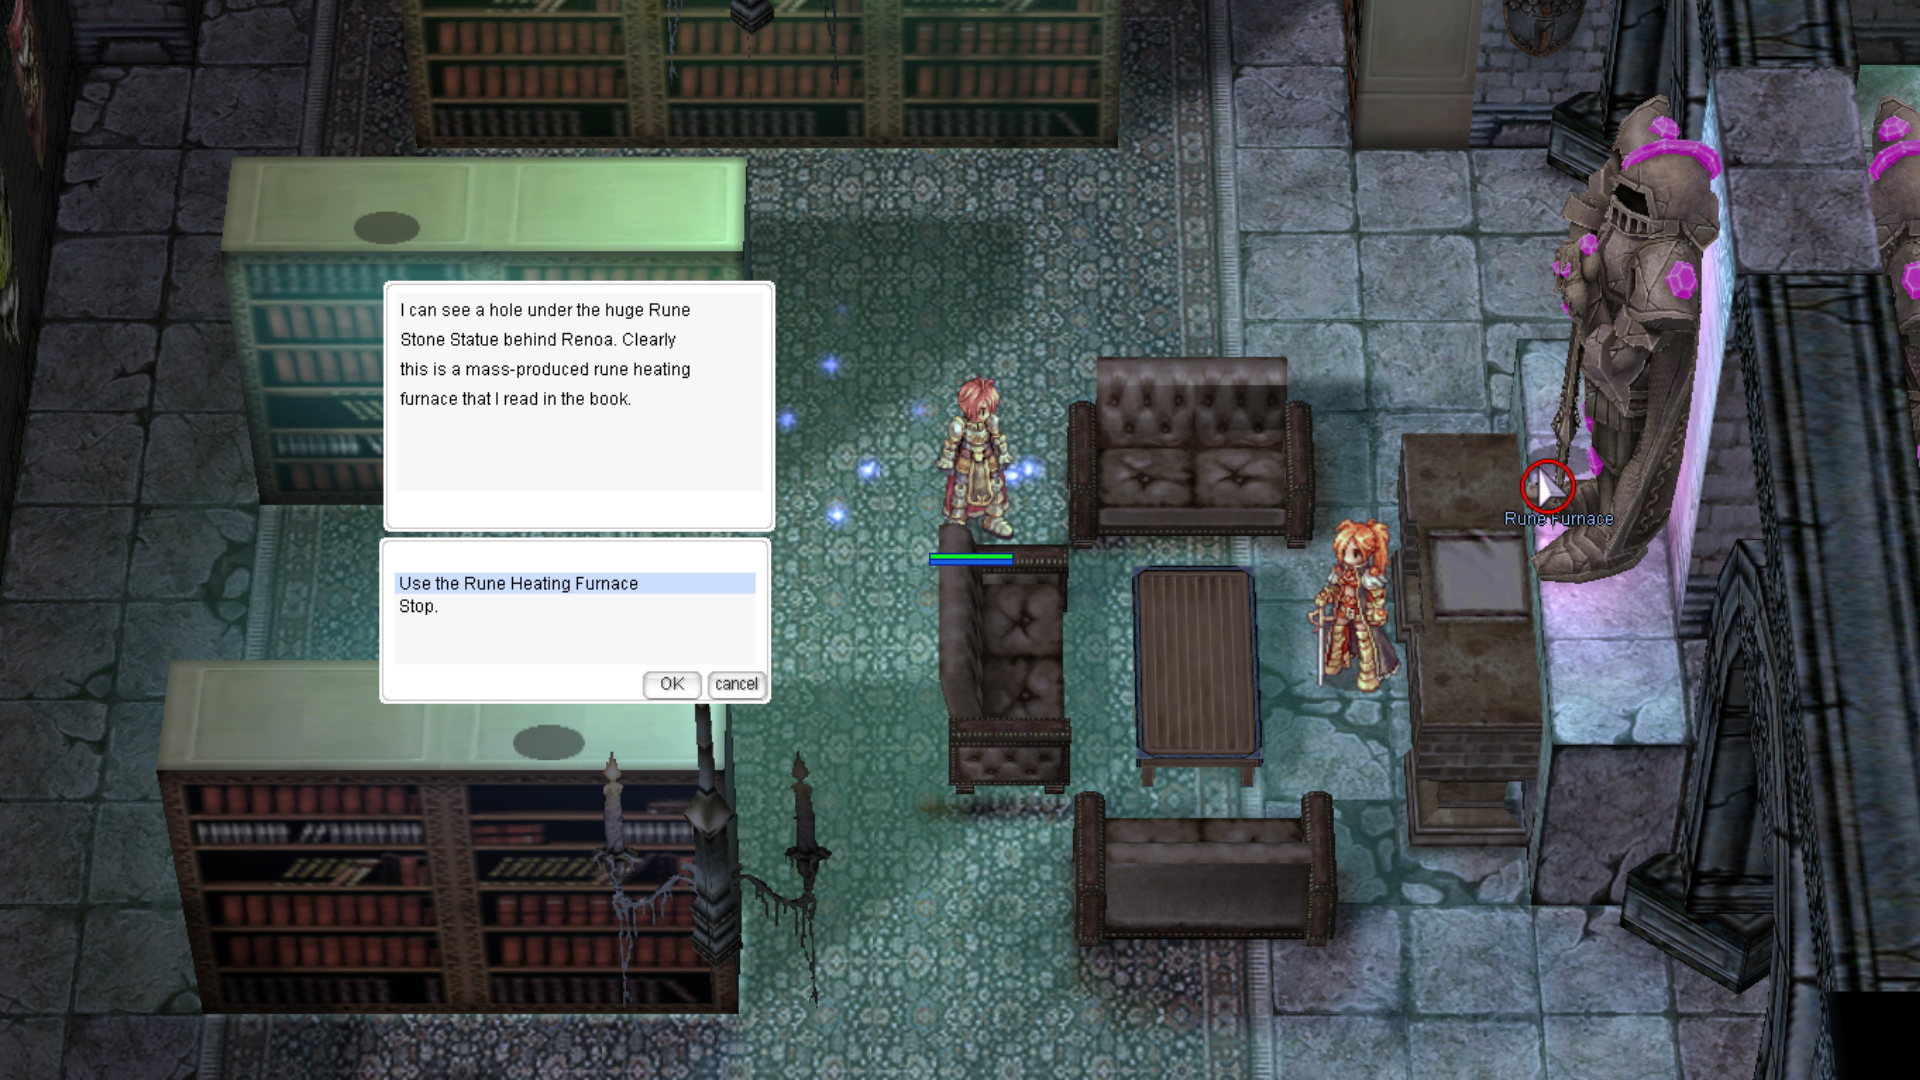
Move to the west side of the room and talk to Rune Knight Renoa at job_rune01 (55,50).
-
Read the three books on the shelves:
-
Runes and Rune Knights
-
The Principles of Runes
-
The Making and Use of Runes
After finishing each book, be sure to select “Stop Reading” before moving on.
-
-
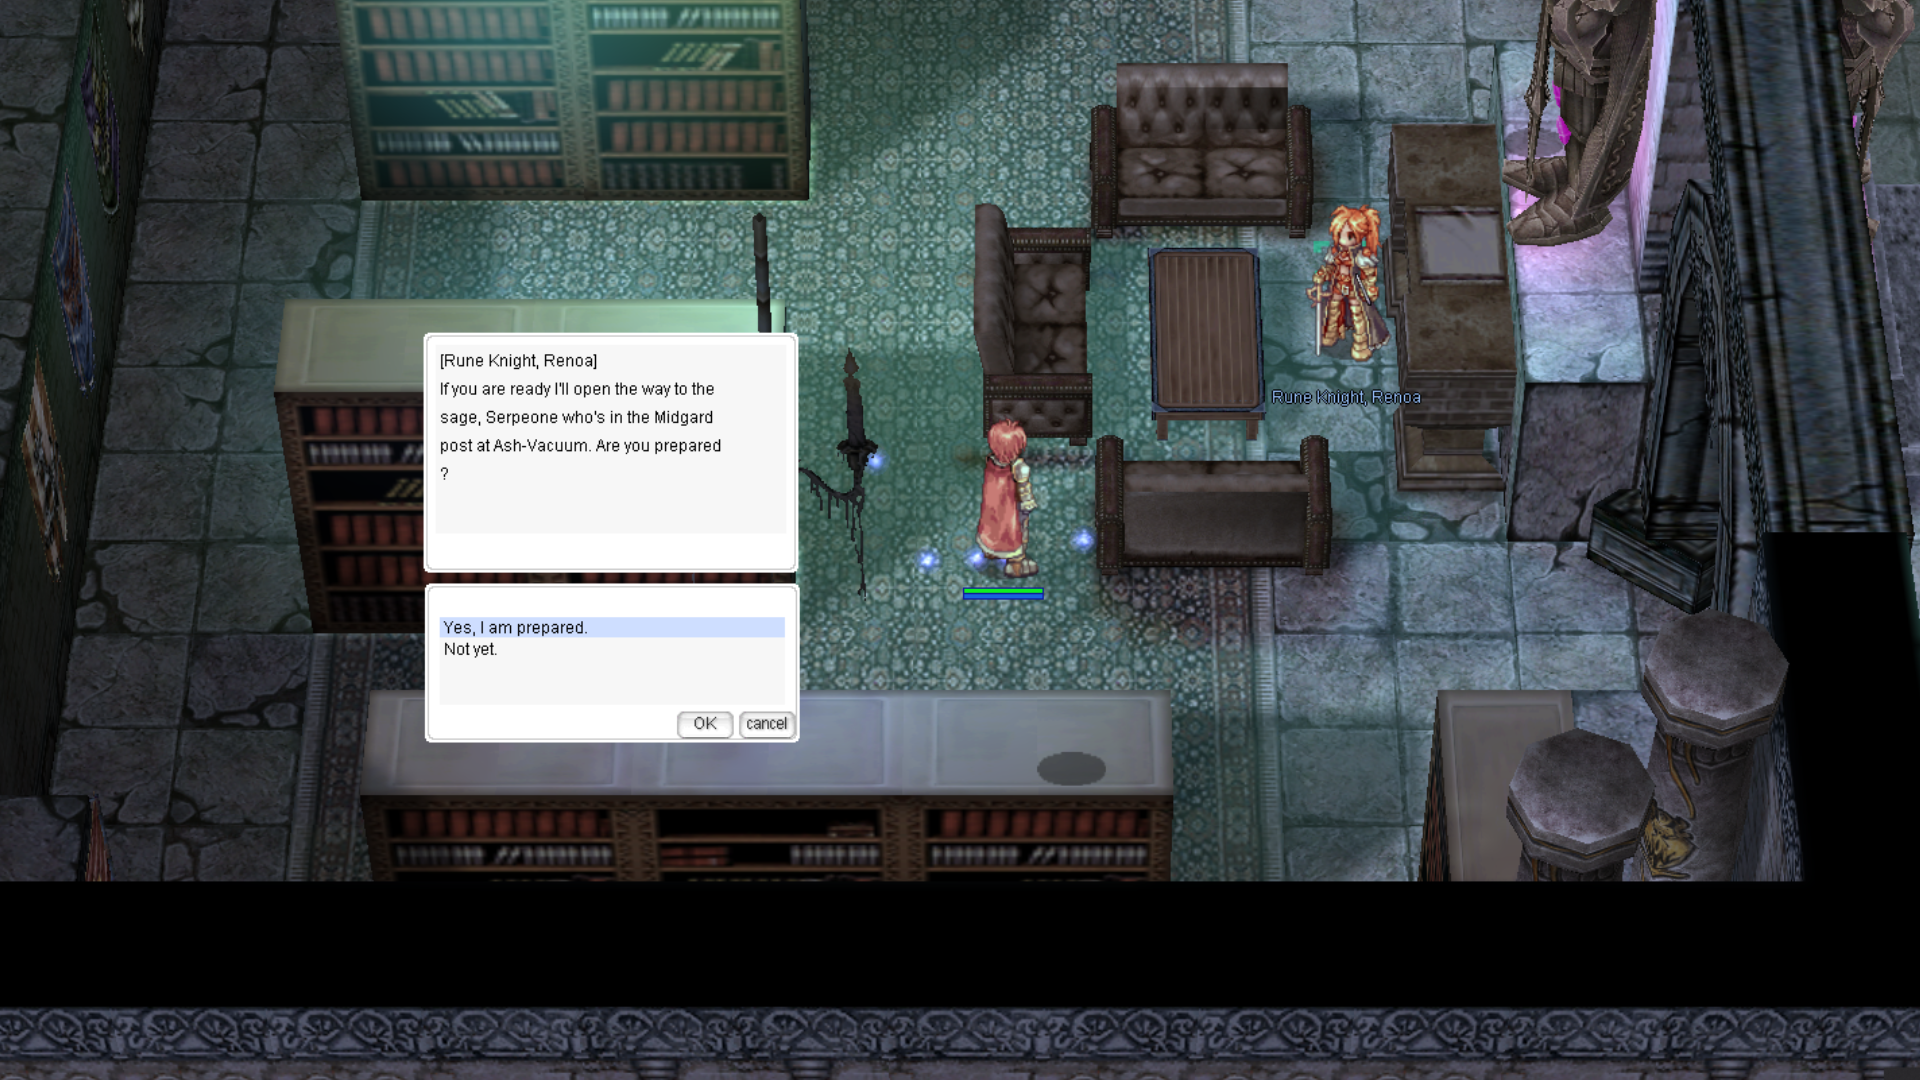
Speak to Rune Knight Renoa again. She will inform you that she will send you to Sage Serfeone in Ash Vacuum.
-
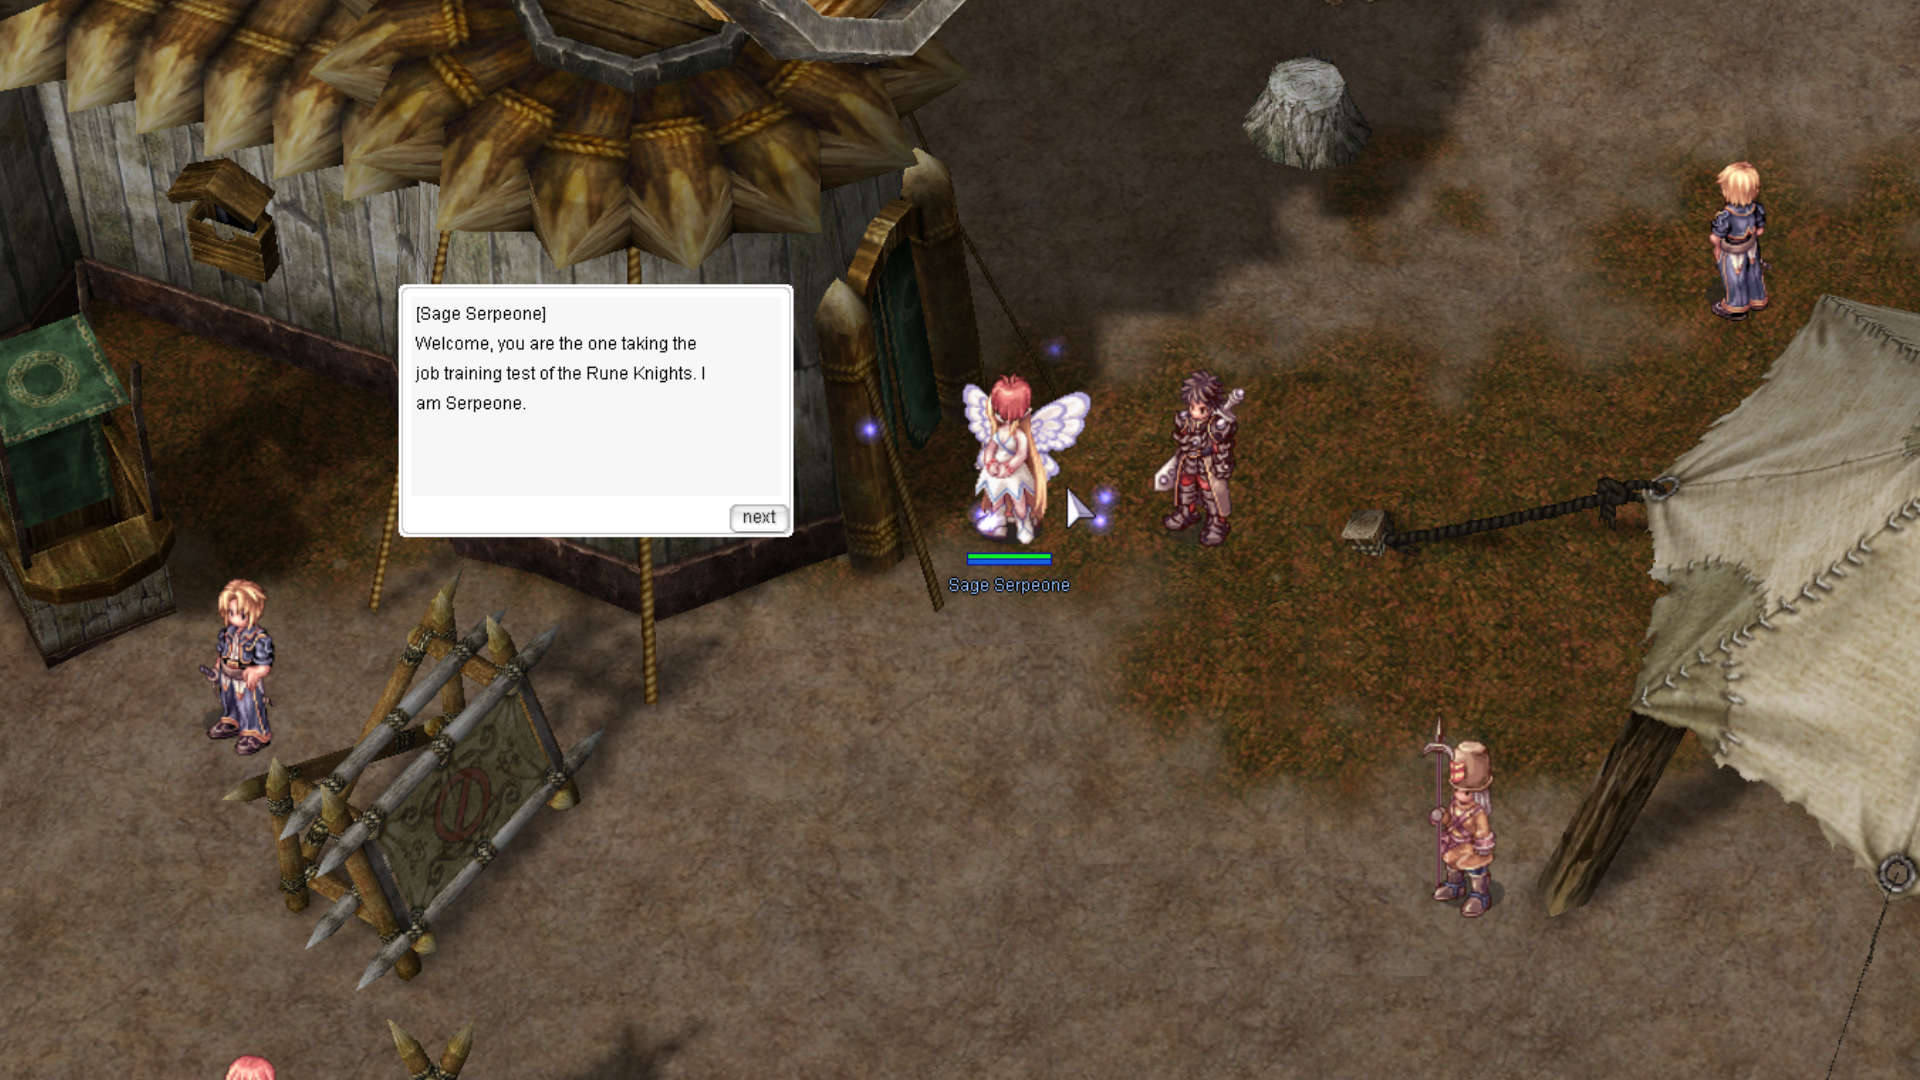
Talk to her once more and choose “I’m prepared.” You will be teleported to Sage Serfeone at the Expedition Camp in Ash Vacuum.
-
Speak with Sage Serfeone at mid_camp (235,250). She will ask you to defeat:
-
10 Dullahans
-
10 Disguises
-
10 Quves
-
10 Heirozoists
-
-
Travel to Niflheim Field 01 (via Umbala or Eden Kitchen) and defeat all required monsters.
-
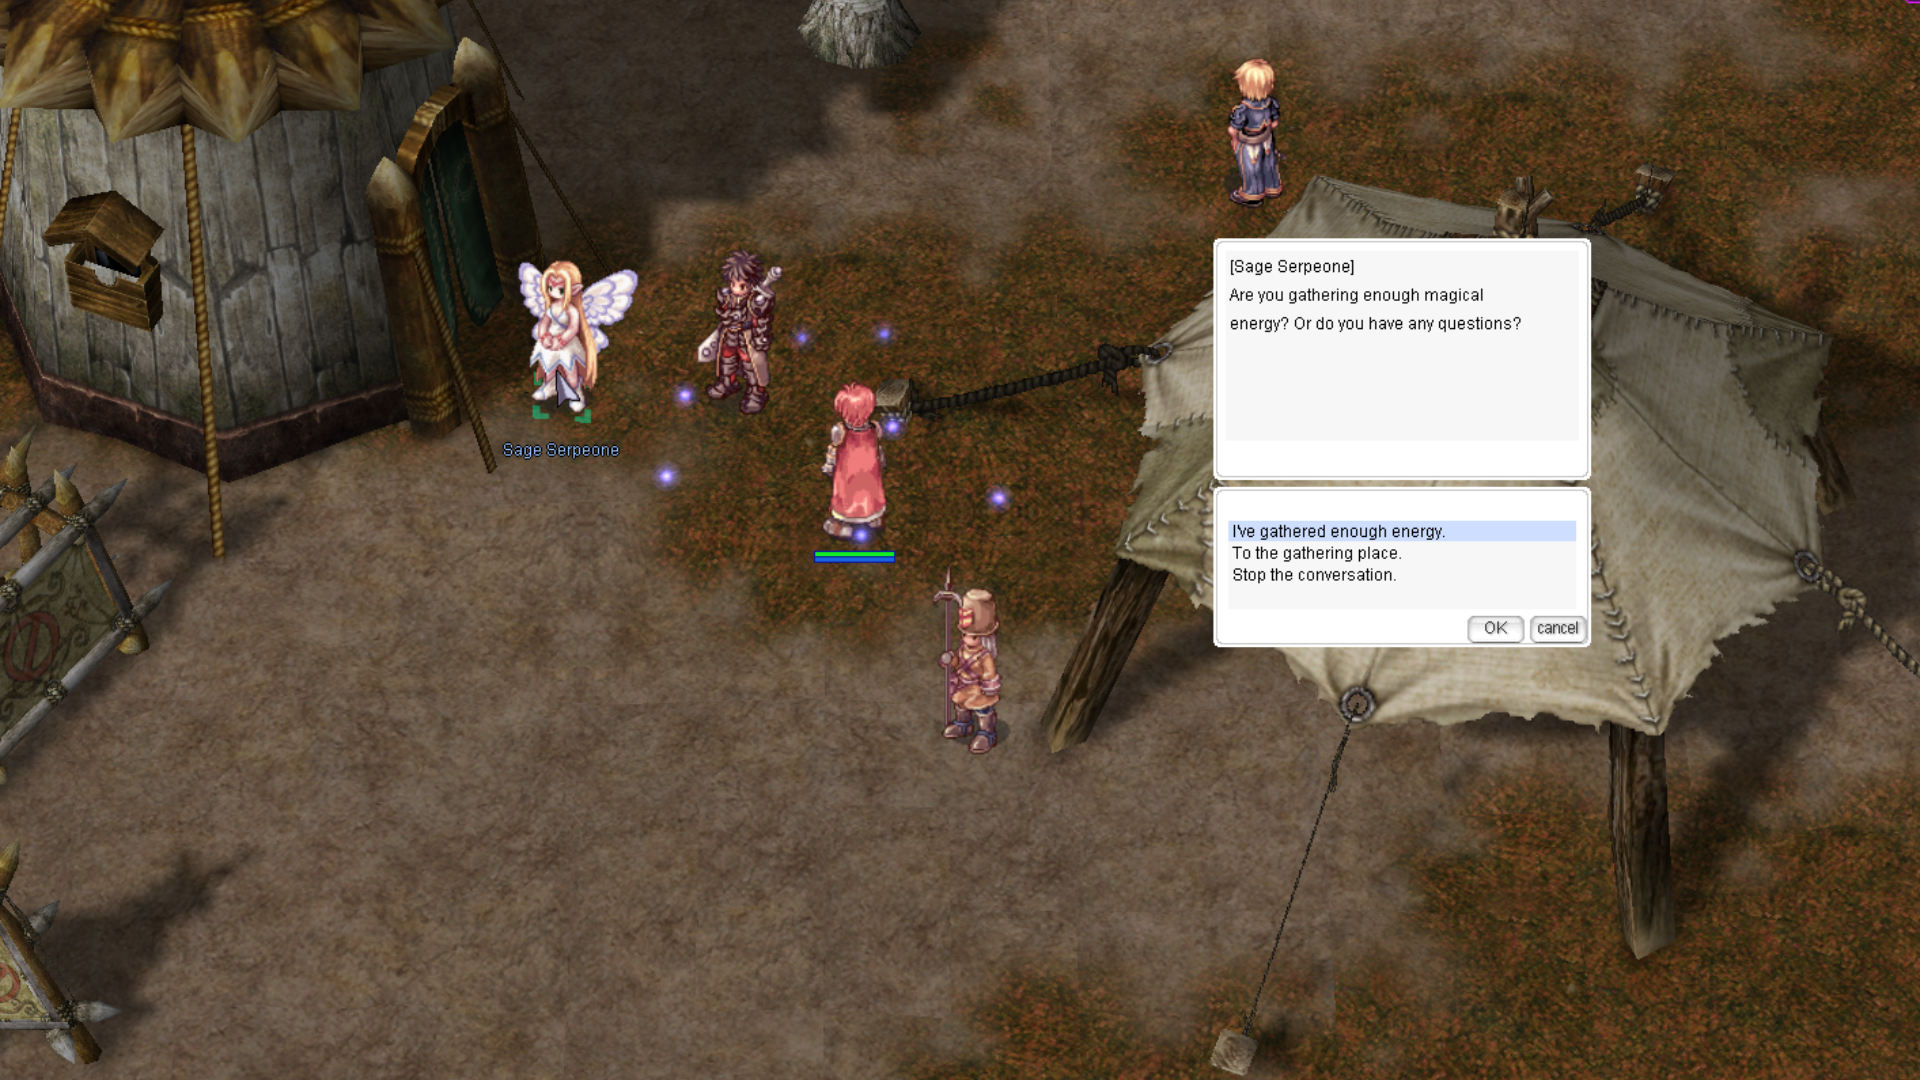
Return to Ash Vacuum and talk to Sage Serfeone again. Choose “I’ve gathered enough energy.” Once confirmed, she will teleport you back to the Rune Knight hall.
If you are sent out accidentally, simply talk to Sage Serfeone again to return.
-
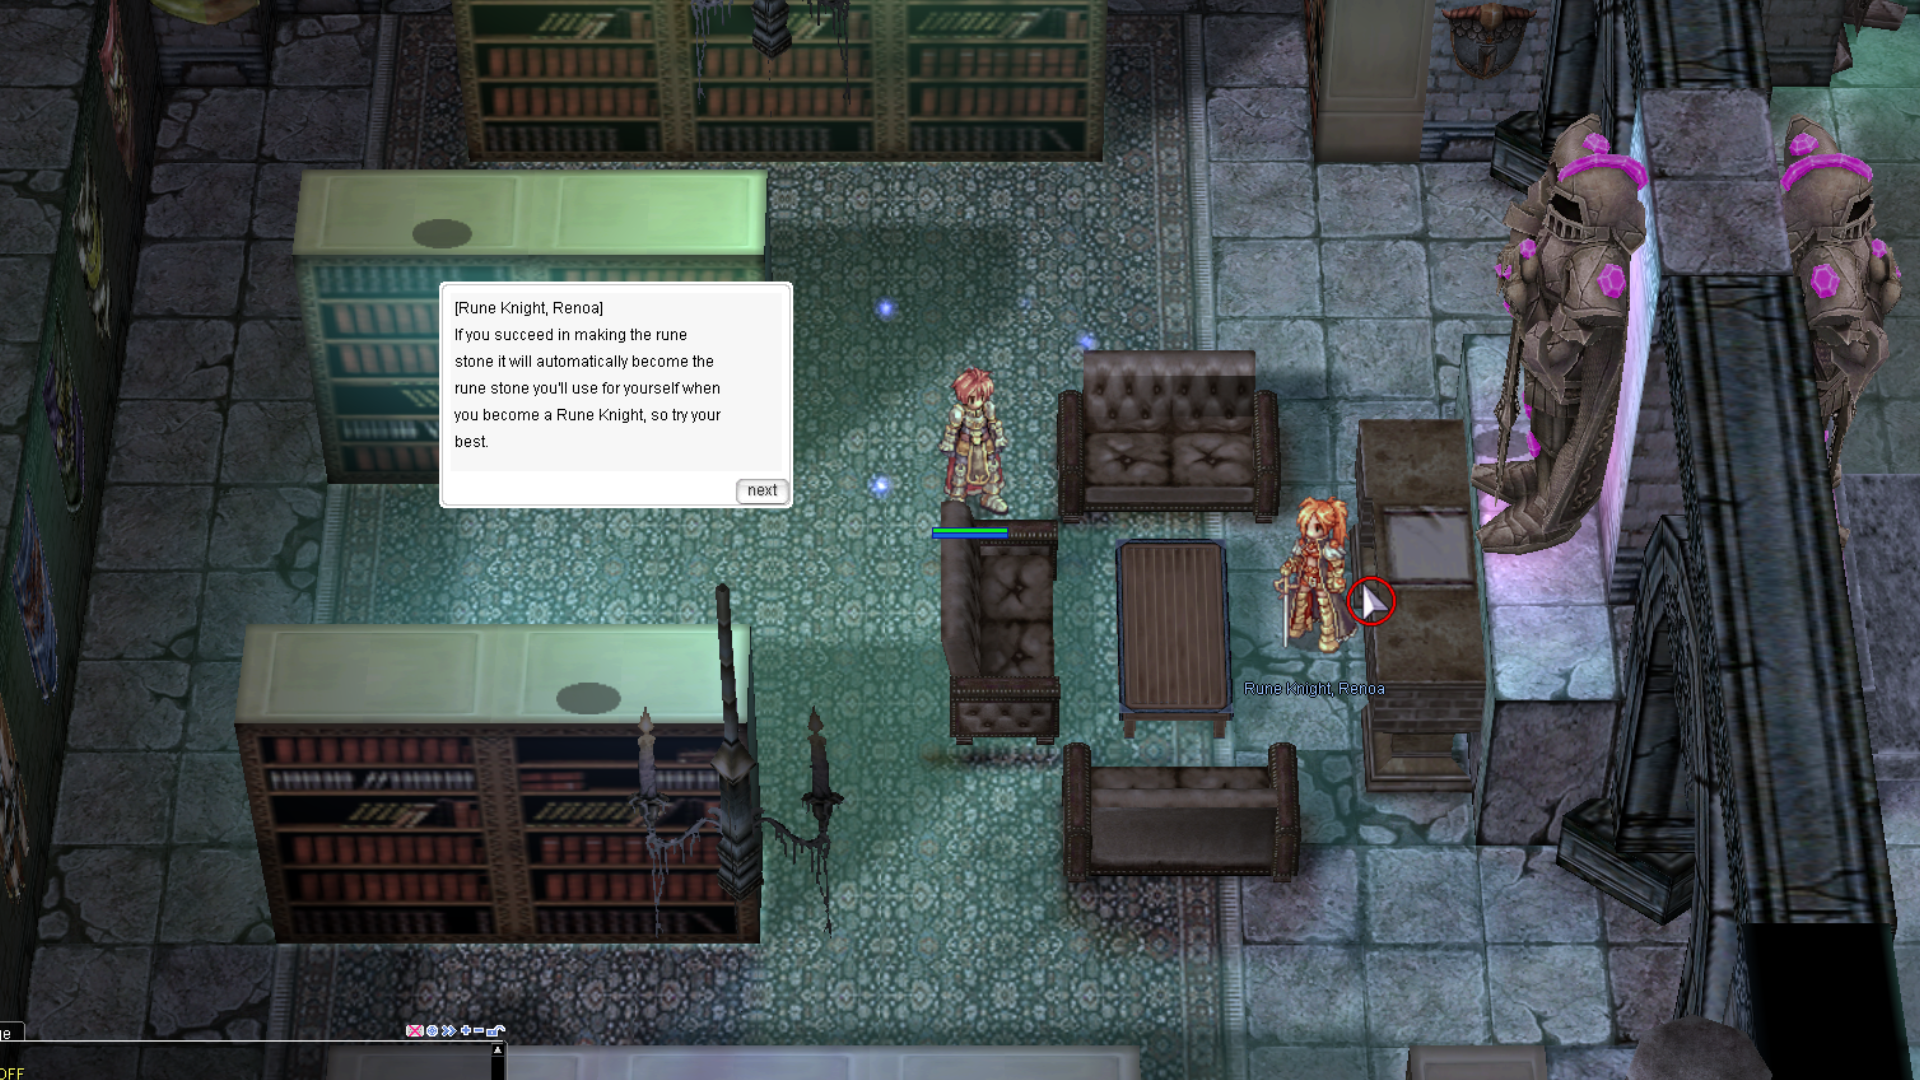
Go west and speak with Rune Knight Renoa.
-
Interact with the furnace next to her. Match each rune to the displayed shape and type the rune name with a capital first letter. There will be a short delay before input is allowed.
-
After successfully crafting 20 runes, speak with Renoa again.
-
Head east and talk to the Rune Knight Captain.
-
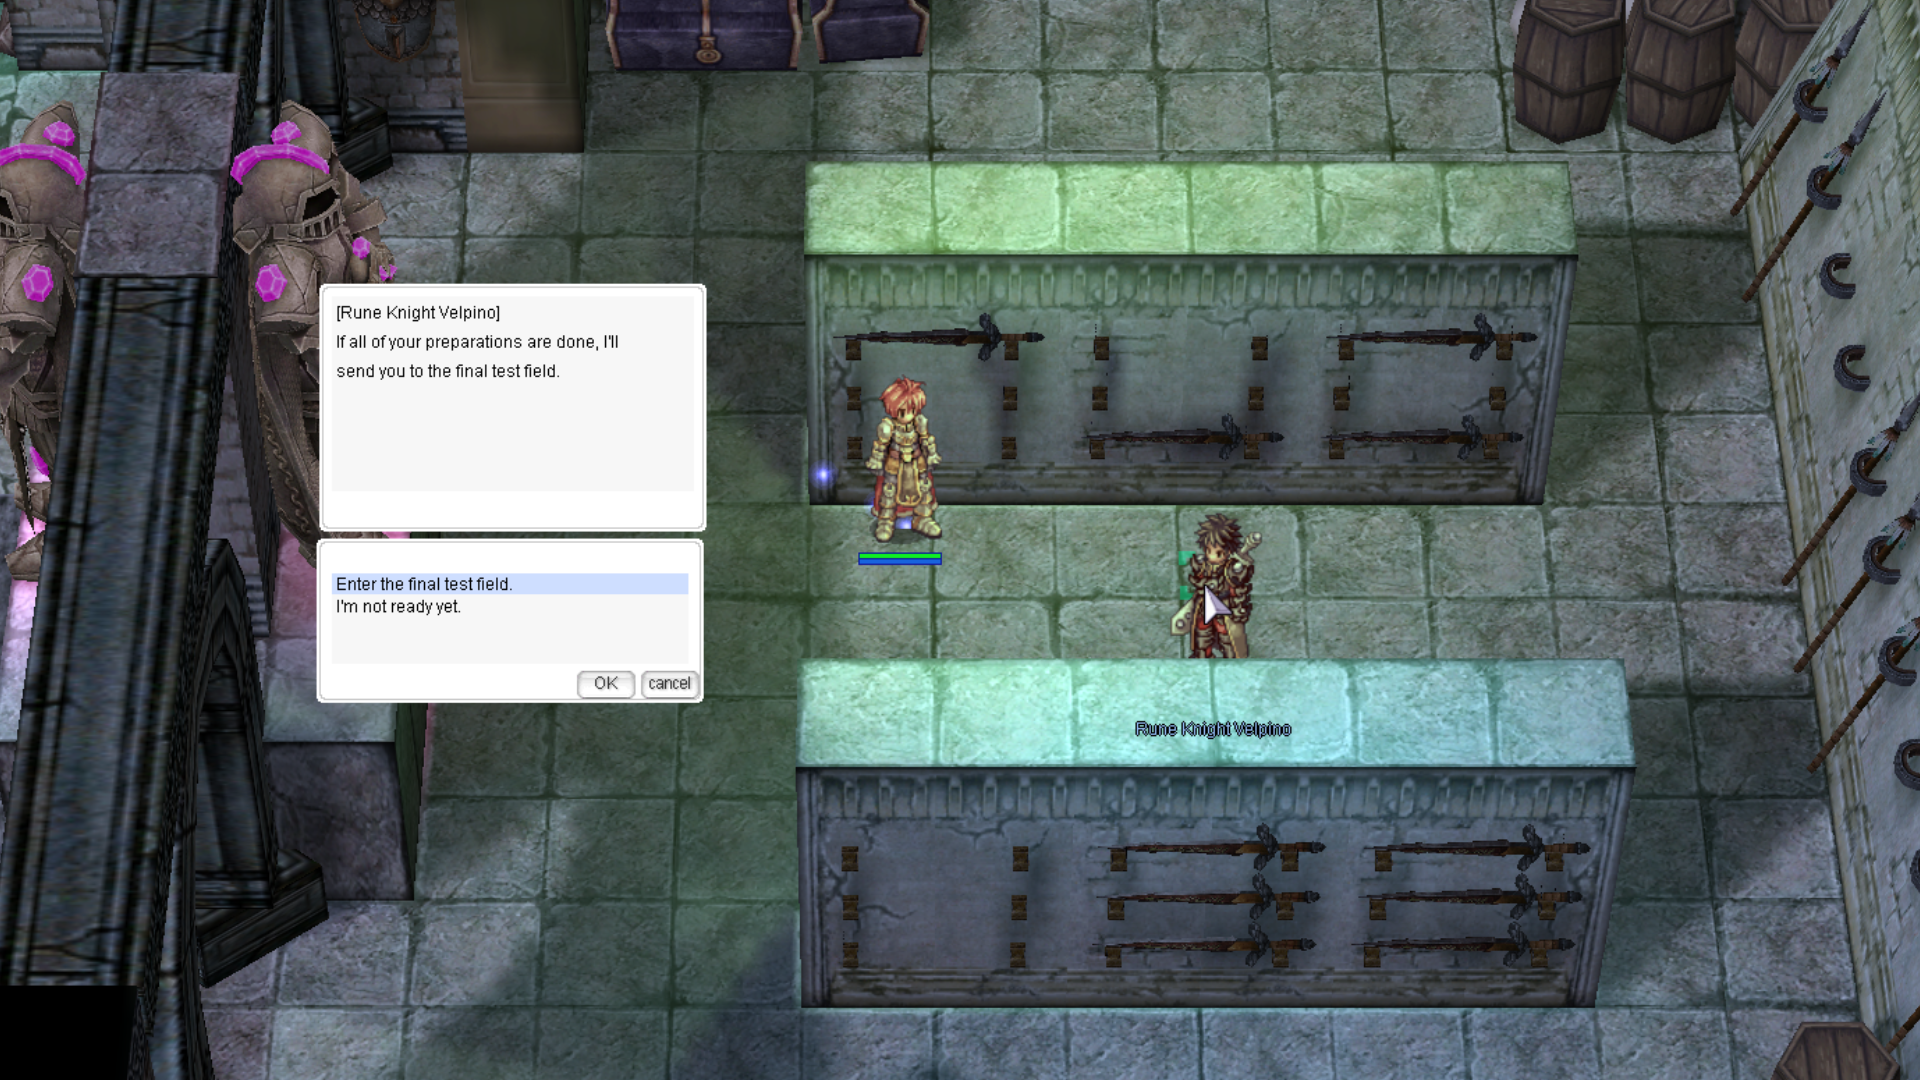
Continue east and speak with Raven Rune Knight Velpino at job3_rune01 (114,50). He will immediately approve you due to your experience with magical swords.
-
Talk to Captain Tigris. He will ask you to dismount your Peco Peco and store all items so your weight becomes 0. After doing so, speak with him again to change your class to Rune Knight.
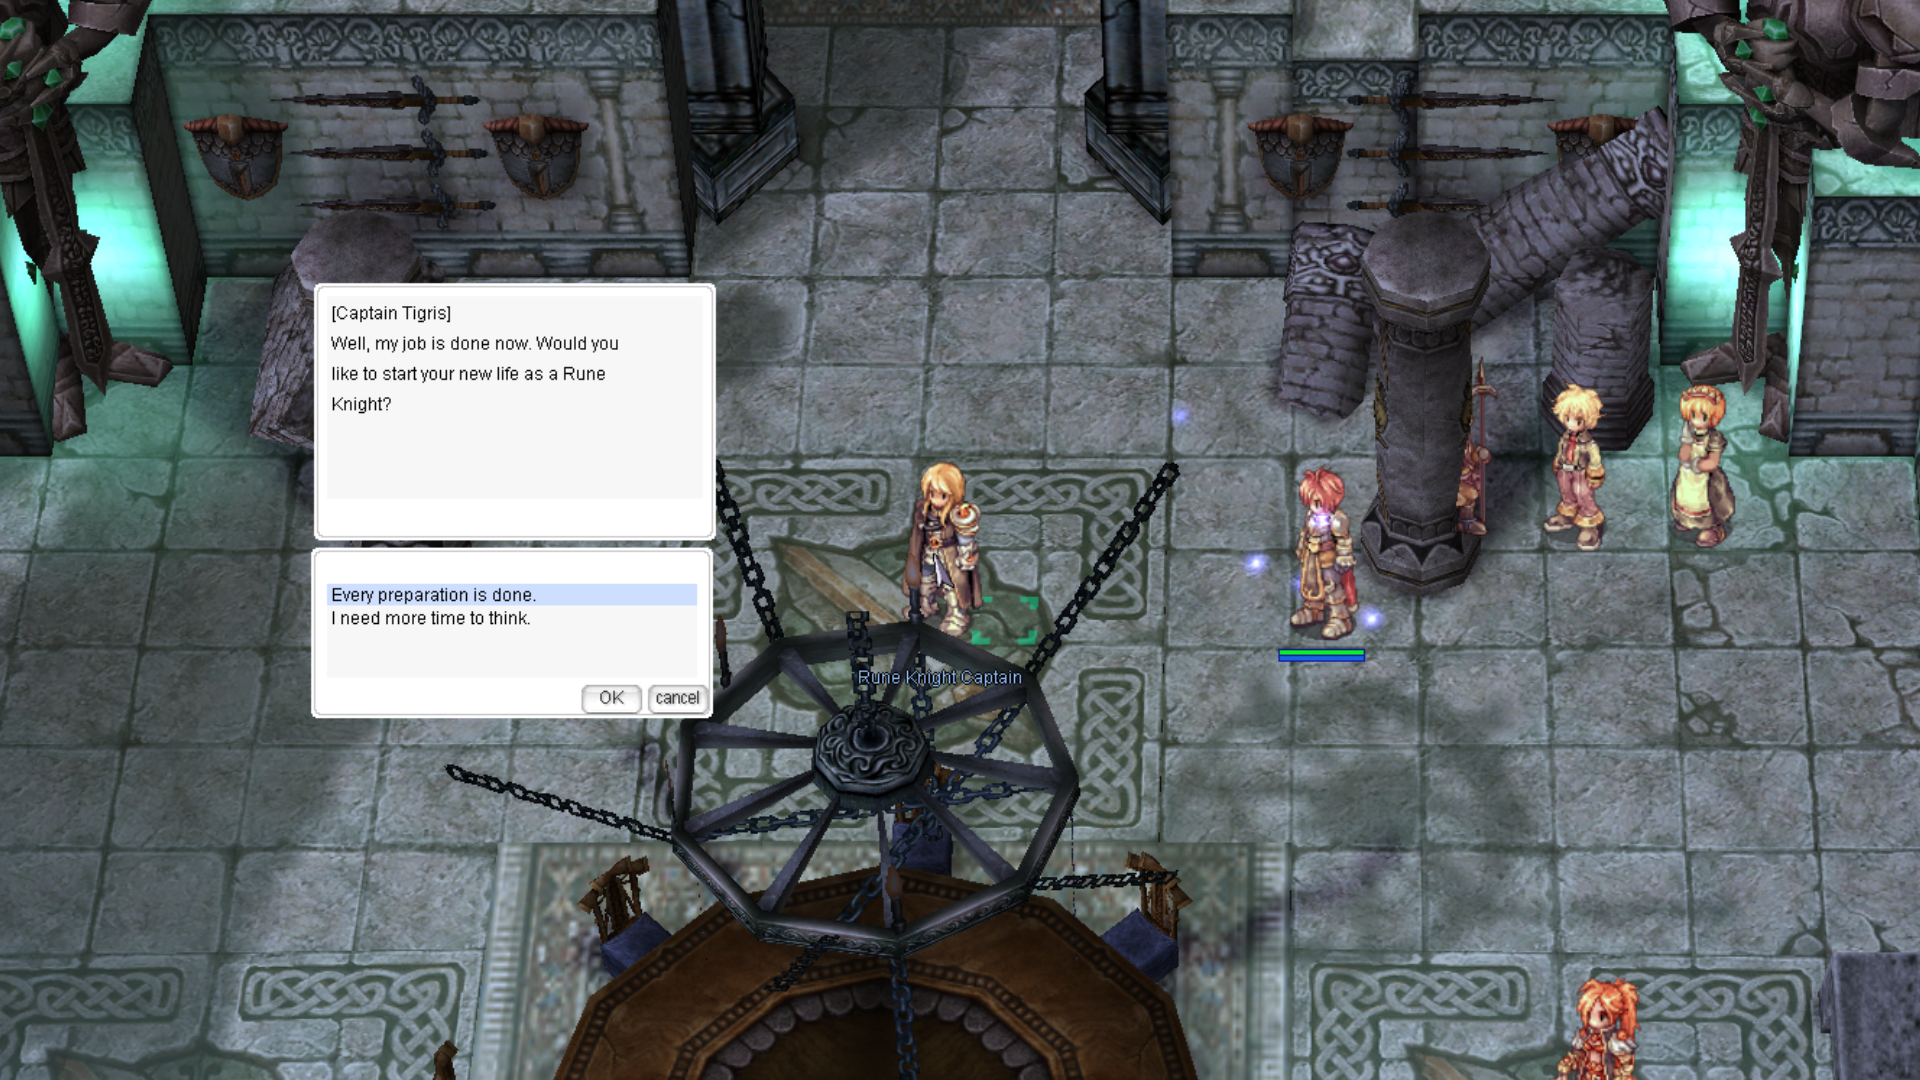
-
You will receive Green Apple Ring x1 and Rune Circlet [1].
-
Speak with him once more to receive one additional reward, based on your rune furnace performance:
-
Rune Plate [1] or
-
Energy Rune Guard [1] or
-
Magic Stone Ring [1]
 Royal Guard
The Royal Guard is a holy defender sworn to protect allies and uphold justice on the battlefield. Armed with sword, spear, and shield, Royal Guards excel at absorbing damage while controlling enemies with powerful defensive and supportive skills. Through sacred devotion, they can unleash holy-based attacks or stand as an unbreakable wall against even the strongest foes.
How to Change to Royal Guard
-
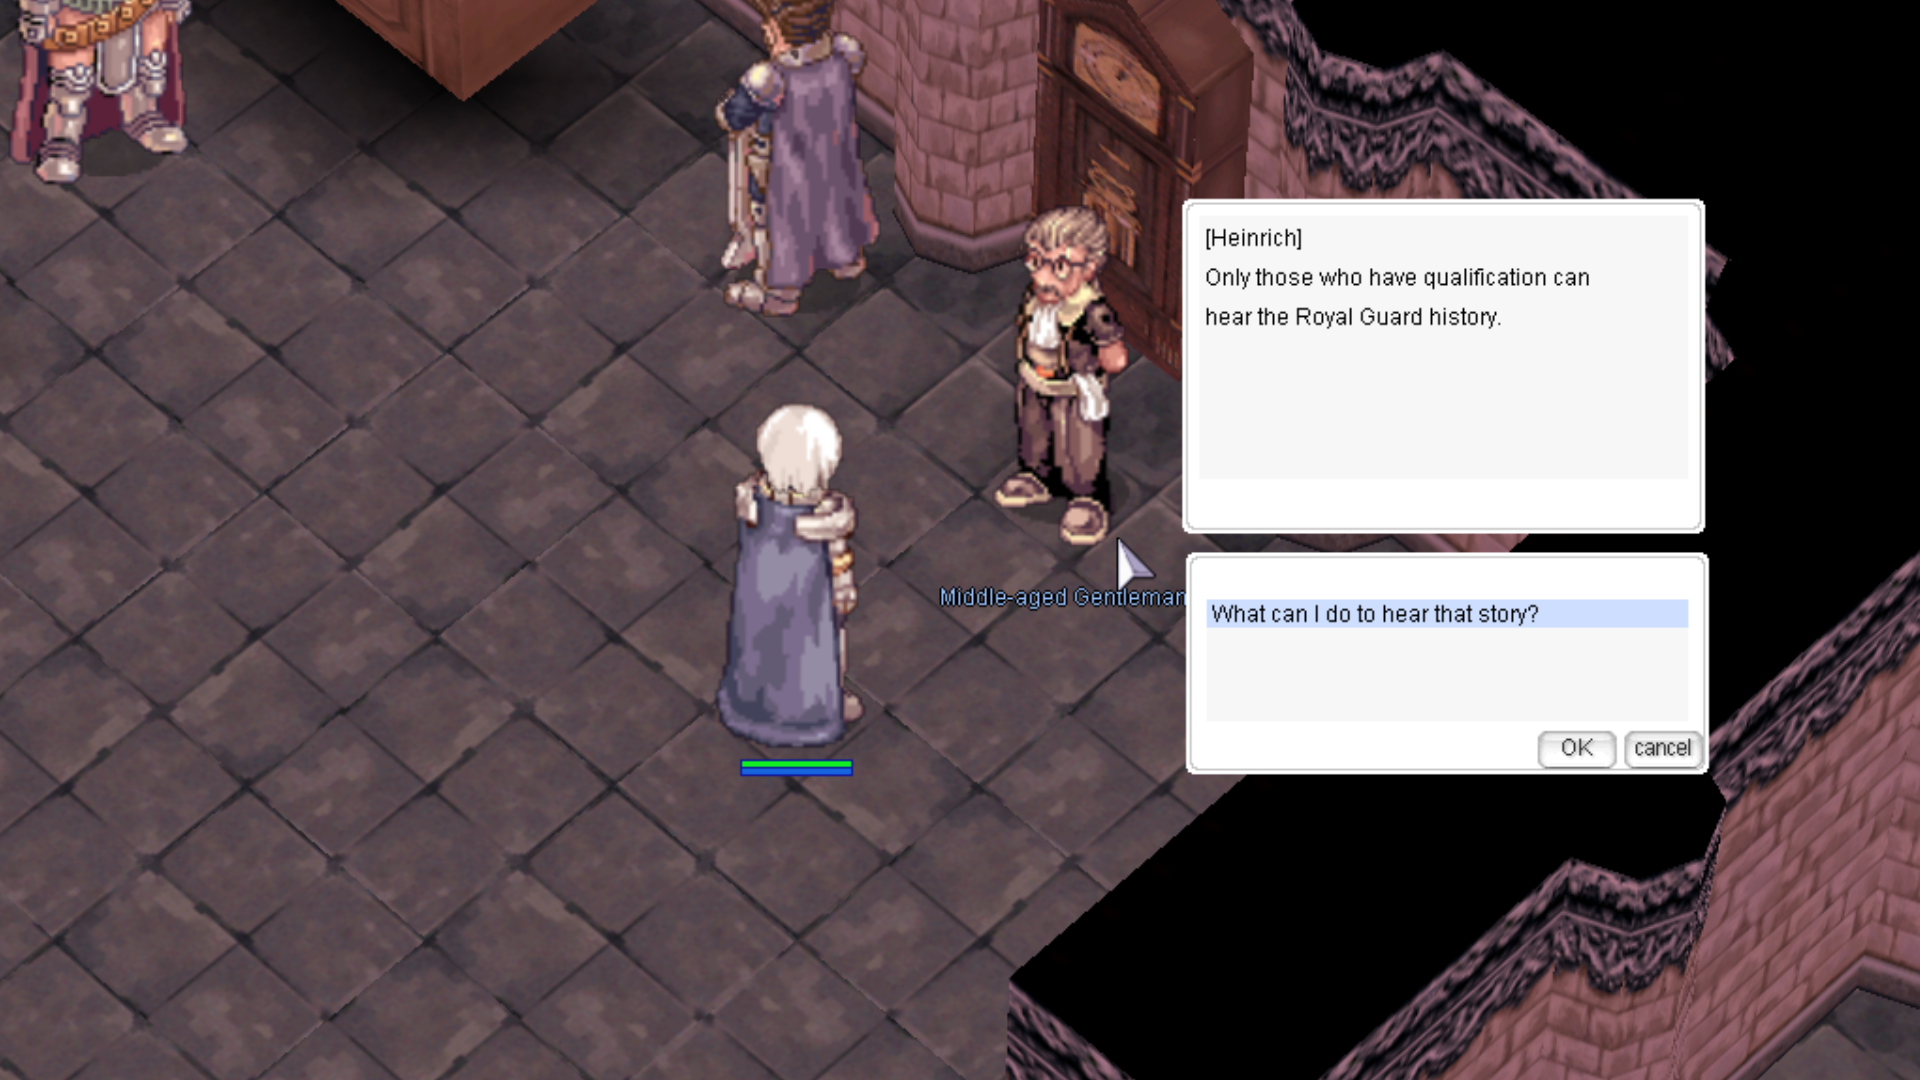
Enter Prontera Castle, go to the Crusader section, and speak with the Middle-aged Gentleman at prt_cas (172,275). He will speak about the lingering traces of King Schmidtz.
Tip: If he mentions that you are carrying too much, dismount from your mount and try again.
-
Talk to him again. When he asks what it means to be a Royal Guard, you may select any answer.
-
To demonstrate your endurance, gather 100 Burning Hearts and return them to him.
-
After submitting the items, listen as he continues his tale.
-
He will explain that the final trace of King Schmidtz can be found within the Glast Heim Monastery.
-
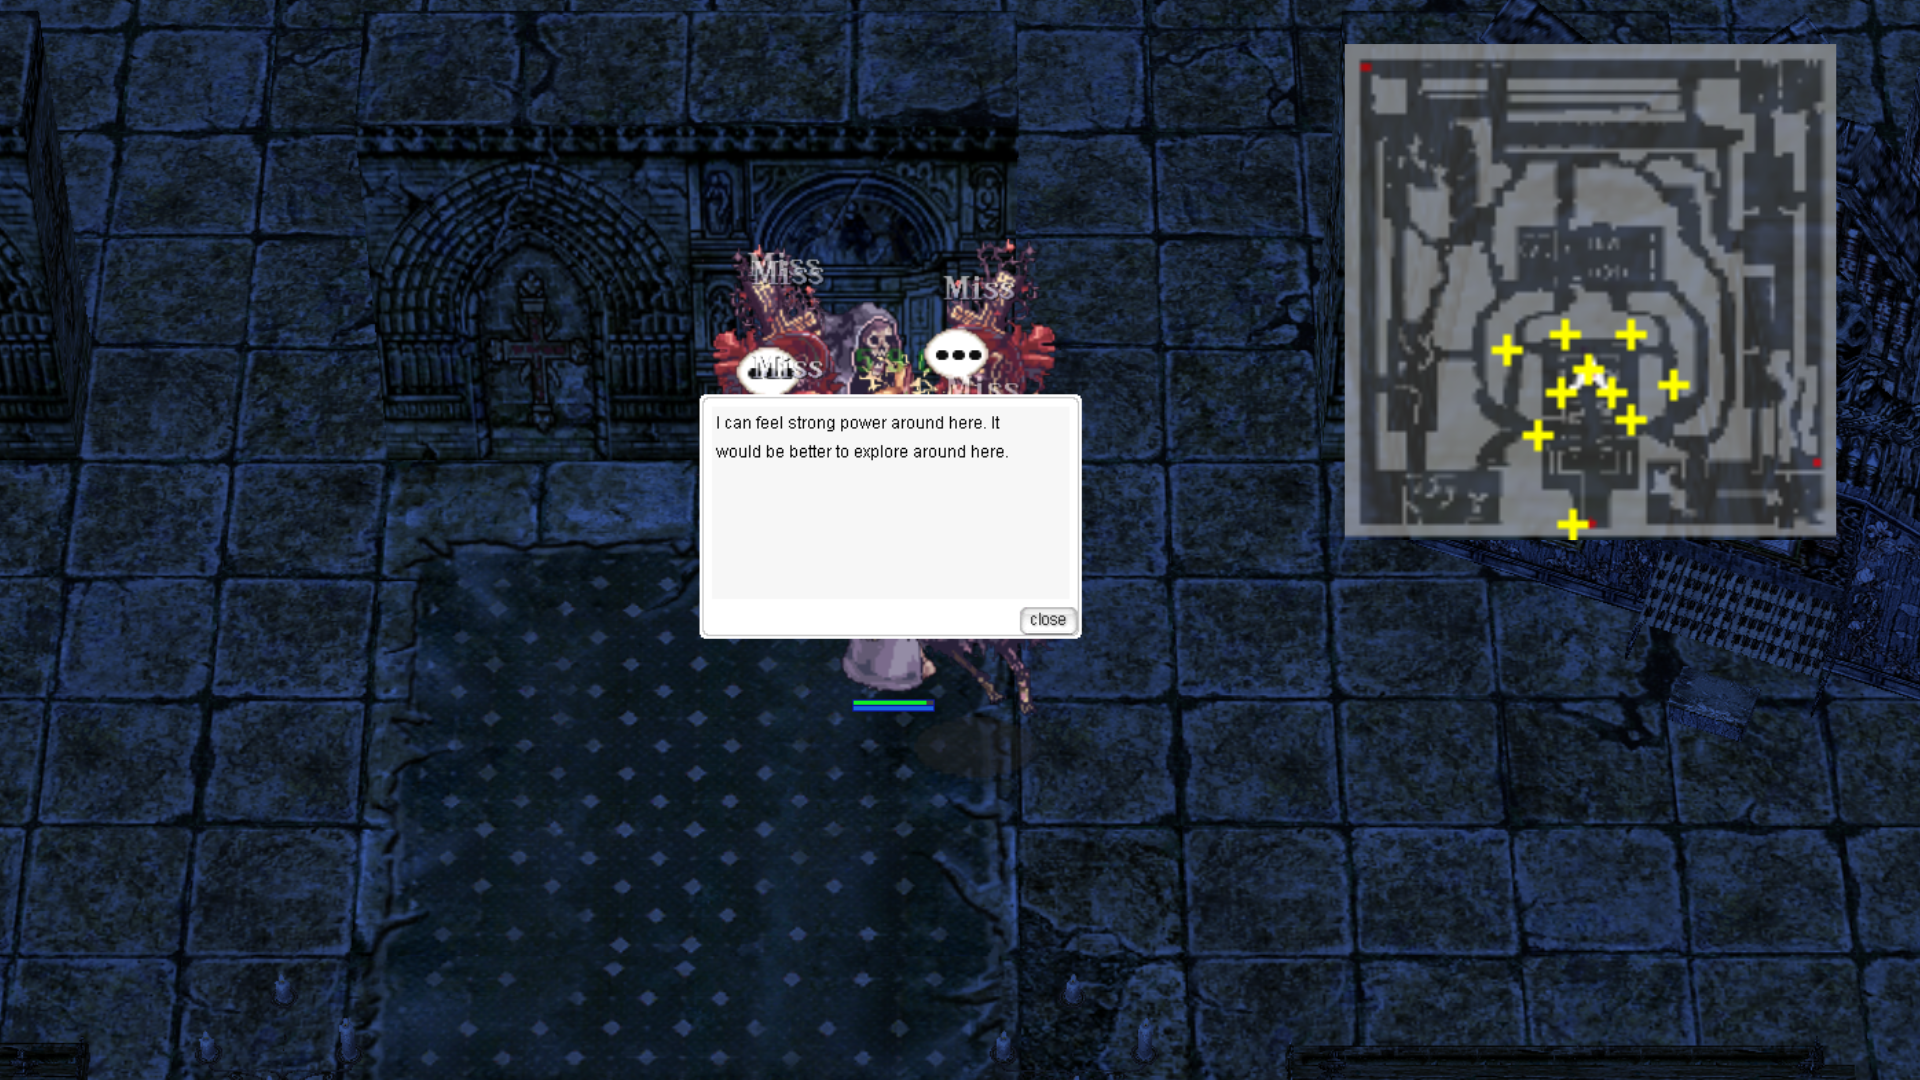
Travel to Glast Heim Abbey and proceed straight forward to gl_church (158,100). A message will appear, signaling a powerful presence.
-
Follow the mini-map indicators and interact with each dim trace until you obtain a piece of Saint’s Clothing.

-
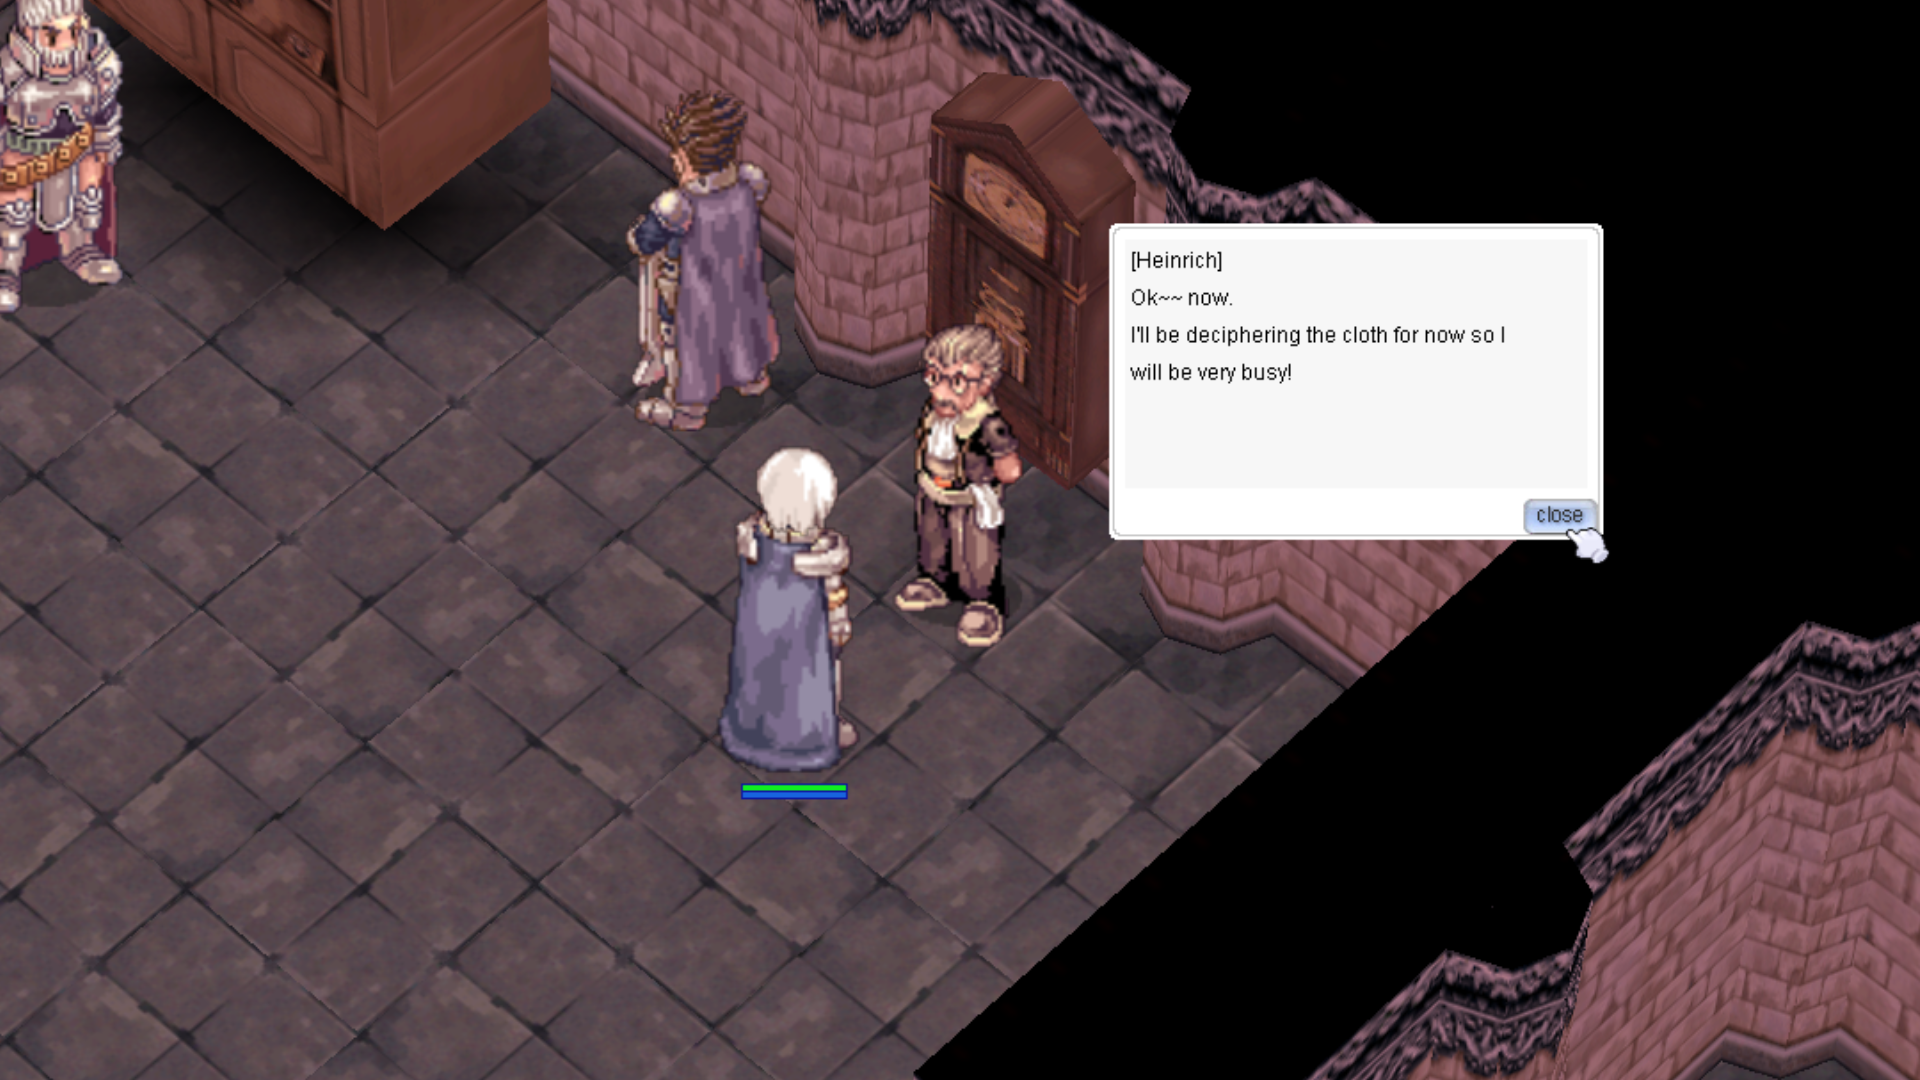
Return to Prontera Castle and speak with the Middle-aged Gentleman again. He will take the cloth and give you a King’s Shield.
-
Examine the shield to discover mysterious text engraved on the back. Check your quest window to read and understand its message.
-
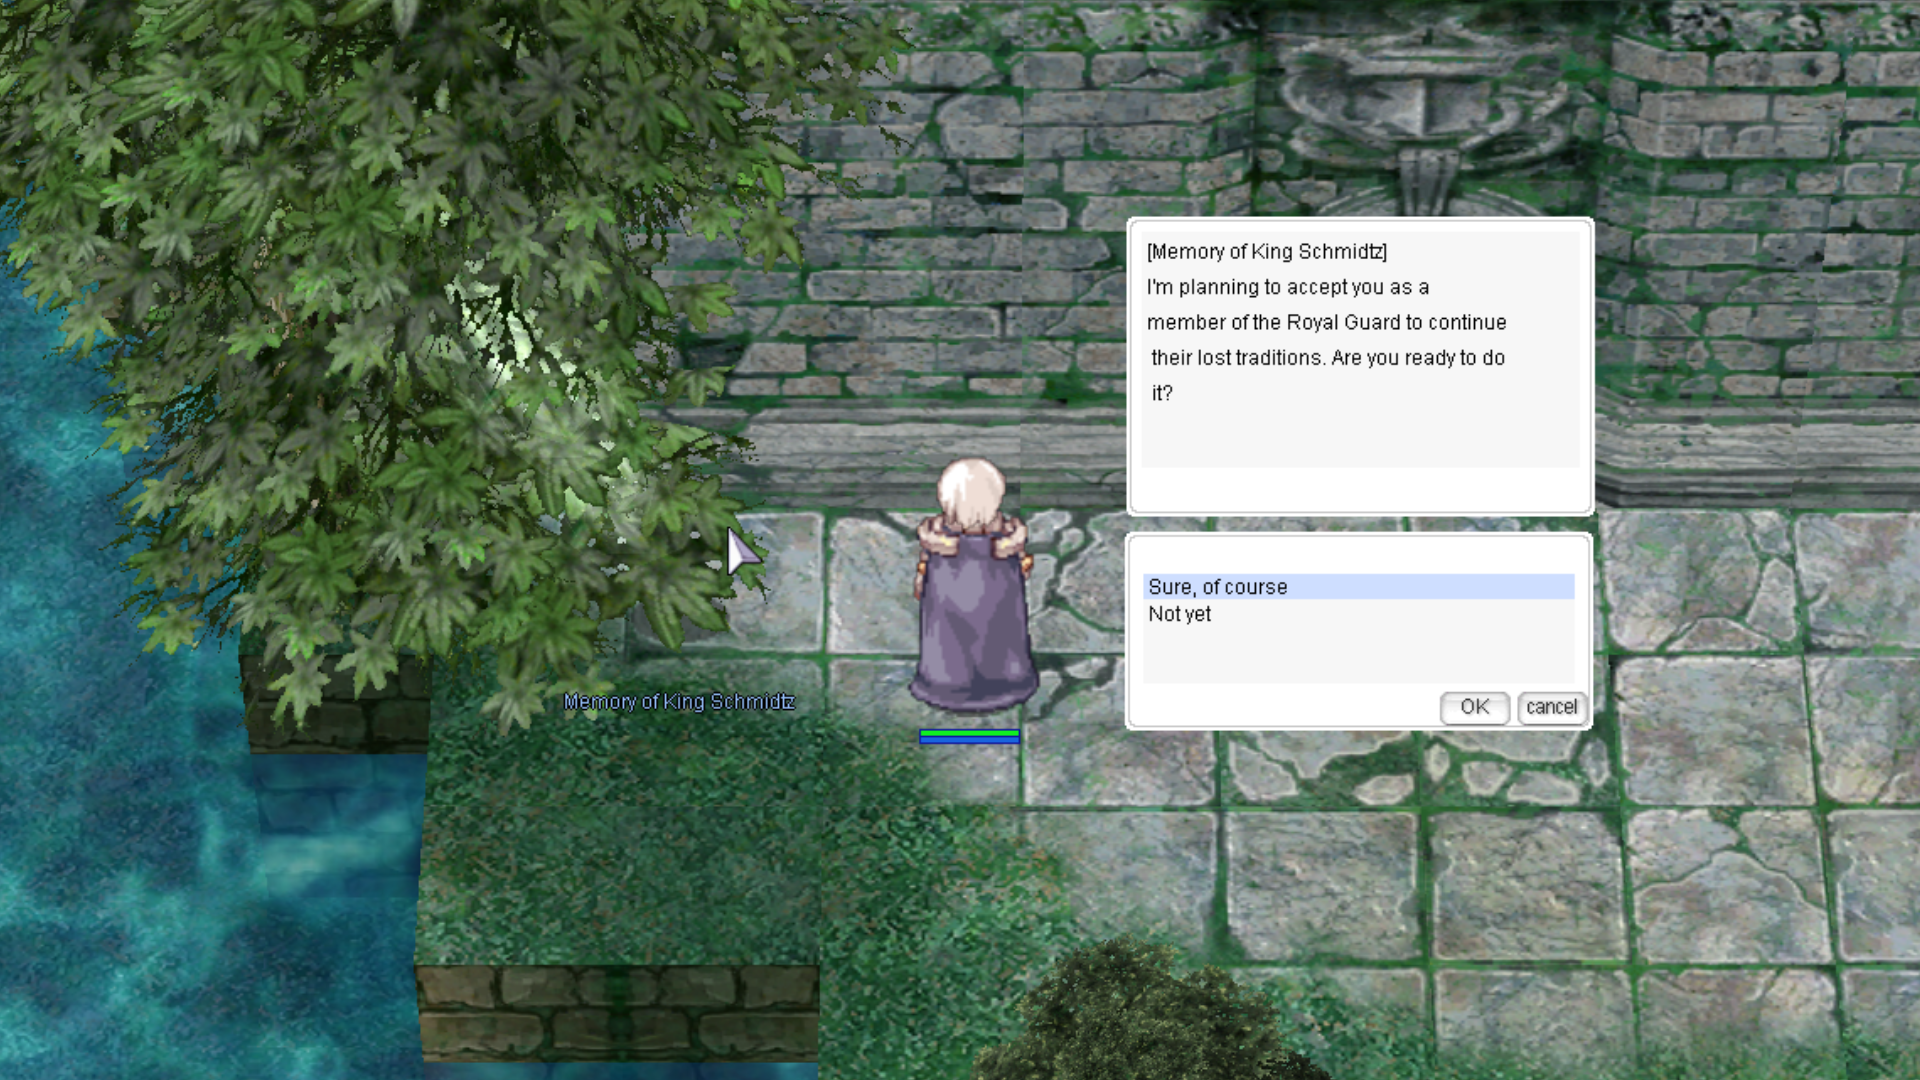
Go back to Glast Heim. At the northern edge of the moat on the right side of the castle, interact with the Memory of King Schmidtz near the tree at glast_01 (240,366).
-
Green Apple Ring
-
Dip Schmidt Helm [1]
 Mechanic
The Mechanic is a master engineer who combines brute strength with advanced technology. Specializing in heavy weapons and mechanical suits, Mechanics excel at dealing massive physical damage while controlling the battlefield with traps, cannons, and automated machines. When mounted in a Mado Gear, they gain access to powerful skills that turn them into a walking weapon of destruction.
How to Change to Mechanic
-
Visit Chainheart in Juno at yuno (129,156) and speak with him three times. During the third conversation, choose “I want to know more.”
-
Go to the entrance of the Juperos Ruins and talk to the Scholar at jupe_cave (37,55). Accept his offer to teleport you directly to the core.
Tip: To avoid battling Dimiks, you can equip a garment with a Frilldora Card and use Cloaking.
-
Once inside, speak with the nearby ghostly flame and listen to its story.
-
Move counterclockwise and talk to the ghostfire in the southwest at jupe_core2 (53,75).
-
Continue moving counterclockwise to find the ghostfire in the southeast at jupe_core2 (242,62) and speak with it.
-
Step onto the western switch located at jupe_core2 (29,150).
-
Next, stand on the eastern switch at jupe_core2 (272,149).
-
Move close to the southern side of the nearby statue to examine it at jupe_core2 (288,142).
-
Stand on the southern switch at jupe_core2 (150,33).
-
Return to the northern ghostfire at jupe_core2 (149,273). After the conversation, it will teleport you back to Juno.
-
Speak with Chainheart once more. He will change your class to Mechanic and reward you with:
-
Driver Band
-
Green Apple Ring
 Geneticist
The Geneticist is a master of alchemy and biological manipulation, blending science with arcane knowledge. Skilled in creating potions, homunculi, and chemical-based attacks, Geneticists can support allies, control the battlefield, and unleash devastating area damage. Their expertise in life sciences allows them to adapt to nearly any combat situation.
How to Change to Geneticist
-
Go to the Alchemist Guild in Al De Baran and find the Alchemist Guildsman on the first floor at alde_alche (35,185).
-
Tell him you are interested in becoming a Geneticist. He will ask you to meet an expert named Devries.
-
Travel to the Geneticist Lab in Lighthalzen at lighthalzen (53,132) and find Devries at job3_gen01 (25,58).
-
Talk to Devries. She will start explaining Geneticist skills, but the conversation is interrupted. She mentions missing her cookies from Rune-Midgard.
-
Go upstairs to Devries’ room and locate the Delivery Box at job3_gen01 (81,72). Take a cookie from the box.
Note: The cookie will not appear in your inventory or quest log.
-
Return to Devries and give her the cookie. Speak with her two more times until she asks you to conduct a plant experiment.
-
Head to the cabinet south of Devries and read the Plant Book. Be sure to read at least the “Plant” option to continue.
-
On the first floor, collect six specific plants for the experiment:
-
Biggy-biggy Plant
-
Aoletur
-
Congra
-
Boggy Vines
-
Muka Tree
-
Sticky Grass
-
-
Once all plants are collected, place them on the table and begin the experiment.
-
Perform the experiment in the following order (names may vary randomly, so you may need to repeat if unsuccessful):
-
Grind Them
-
Heat Them
-
Mix them in a Flask
-
Soak them in Distilled Water
-
Inject into a Testing Seed
-
Choose any type of Testing Seed when prompted. Completing this yields a Seed for Experiment.
-
Return to Devries. She will recommend visiting the Alchemist Union Member, but instead asks you to see Demi Calberine on the second floor at job3_gen01 (91,48).
-
Demi Calberine mentions she is building a new cart but is missing some parts.
-
Investigate the Scattered Objects on the second floor. After checking all of them, speak with Demi Calberine again.
-
She will ask you to test the Cart Revolution on Poison Spores. You will be teleported to the Poison Spore pen on the first floor.
-
Kill 100 Poison Spores. They respawn a few seconds after being defeated.
Tips:
You can leave the pen anytime by talking to the sign outside.
If you die or exit, talk to Demi Calberine to re-enter.
Only Poison Spores inside the pen count for this quest.
Using Cart Revolution is optional but makes the task faster.
-
After defeating 100 Poison Spores, speak with the Warning Sign outside the pen.
-
Remove your Cart, then return to Devries. She will inform you that no response has arrived yet.
-
Talk to Devries again, and she will promote you to Geneticist.
-
Midas Whisper [1]
-
Green Apple Ring
 Warlock
The Warlock is a master of dark and forbidden magic, blending destructive spells with demonic power. Specializing in area-of-effect and high-damage magical attacks, Warlocks can manipulate the battlefield to weaken enemies and control the flow of combat. Their skills rely on precise timing and powerful elemental spells to devastate opponents.
How to Change to Warlock
-
In Morroc, head roughly toward 8 o’clock from the town center. Walk 10 cells north of the Volunteer-Morroc NPC. A popup will appear at morocc (95,132) (or morocc 90/144 on the rebuilt map). Select the first option to be teleported to a small room with a Warlock and three assistants.
-
Inside, talk to any NPC. The assistants will notice you and summon the Guild Master, Master Egnoloria at spl_in02 (80,108). She attempts a spell, but you resist. Afterward, you may request to become a Warlock.
-
Speak with the blond-haired assistant Yoop at spl_in02 (77,107). She asks you to collect a Giant Bradium Fragment and a Glittering Crystal.
-
Talk to Yoop again. She will give you Magical Stone (Anti-Golem) and Magical Stone (Anti-Naga). Use the assistant in the white dress to leave the room and be teleported to Splendide.
-
Equip the two Magical Stone Accessories and hunt the special monsters Magic Monster Naga and Bradium Golem in Splendide Field 2.
-
Killing these monsters with the accessories equipped gives a chance to obtain the quest items.
-
Items are character-bound. Make sure item sharing is OFF if in a party.
-
If you sold the accessories, speak to the fairy at spl_in02 (60,231) with a 3-carat Diamond to get replacements.
-
-
Return to Yoop (spl_in02 60/231) and return the items. She instructs you to go back to the Guild Master, unequipping the accessories first.
-
Go to the Guild Master’s room in the north-west corner of Splendide (splendide 140/284) or return to the wall in Morroc (morocc 90/144).
-
Speak with the blue-haired assistant at spl_in02 (84,103). She gives you 4 types of Rainbow Rubies (5 each) that mimic Warlock AoE spells:
-
Frost Misty
-
Chain Lightning
-
Earth Strain
-
Crimson Rock
You will now be sent to the testing area.
-
-
Wait to enter the Magical Room if others are ahead. Bring plenty of healing potions.
-
In the testing area, two waves of monsters spawn:
-
2 Nagas
-
2 Bradium Golems
-
2 Dark Pinguiculas
-
2 Aqua Elementals
Kill them using Rainbow Rubies or your own skills within 5 minutes per wave. Tips: -
Cast Storm Gust Lv.1 or Frost Nova Lv.10 immediately and move to a corner.
-
Use Chain Lightning on Aqua Elementals and Crimson Rock for the rest.
-
Safety Wall can help for corner defense.
-
Bring Condensed White Potions and optionally Token of Siegfried for revival.
-
After defeating the first wave, a second identical wave appears. Kill all within 5 minutes.
-
Next, magical Porings spawn. Defeat all of them.
-
Finally, a Hollow Stone appears. You have 10 minutes to kill it. Using Jupitel Thunder repeatedly works well.
-
After completing the test, you are teleported back to the Guild Master’s room. Speak to the assistant on the right, then the Guild Master.
-
The Guild Master will promote you to Warlock and award:
-
Green Apple Ring
-
Magic Stone Hat [1]
 Sorcerer
The Sorcerer is a master of elemental and rune-based magic, blending mystical knowledge with ancient power. They excel in dealing massive magical damage, summoning creatures, and manipulating elemental forces to control the battlefield. Sorcerers are highly versatile, able to adapt their spells to both offensive and supportive roles.
How to Change to Sorcerer
-
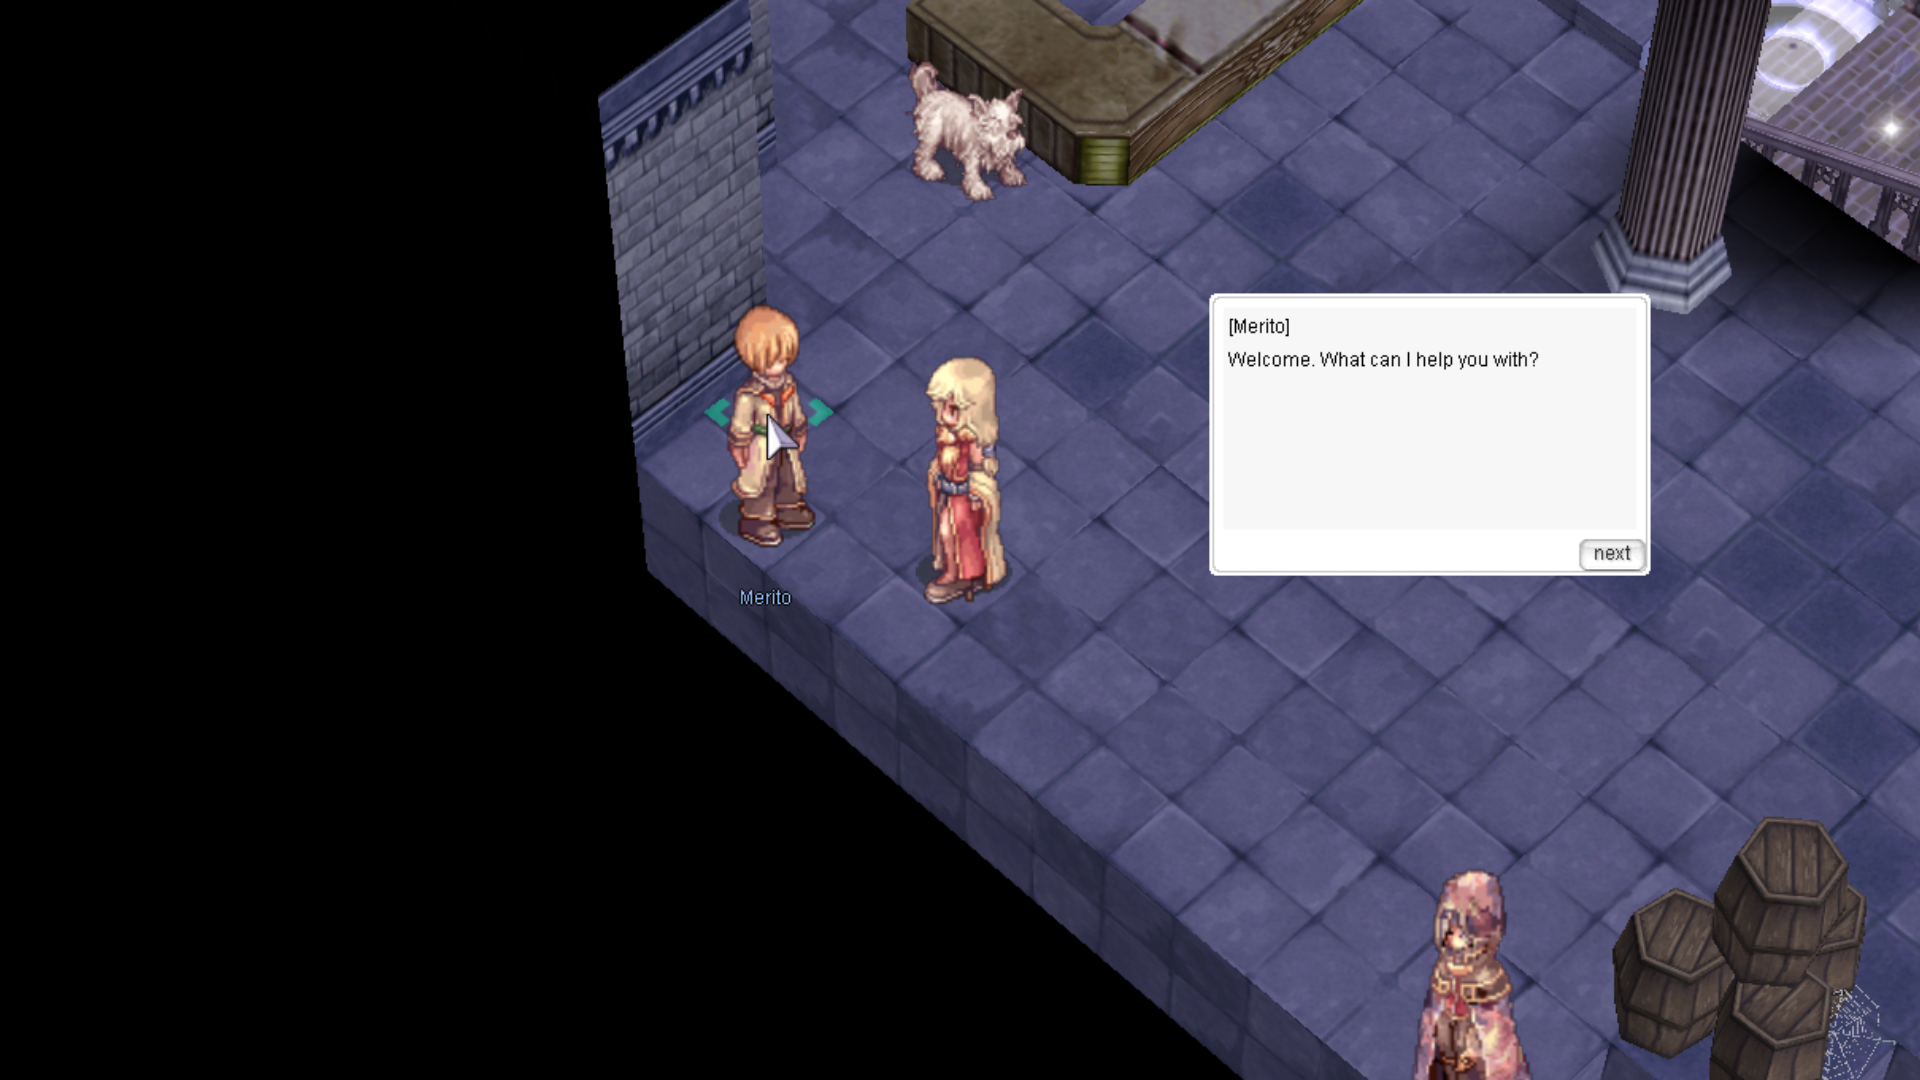
Go to the top floor of Geffen Tower and speak with Merito at gef_tower (102,34). When he asks why you are here, select any option except the last. Give him your name when prompted.
-
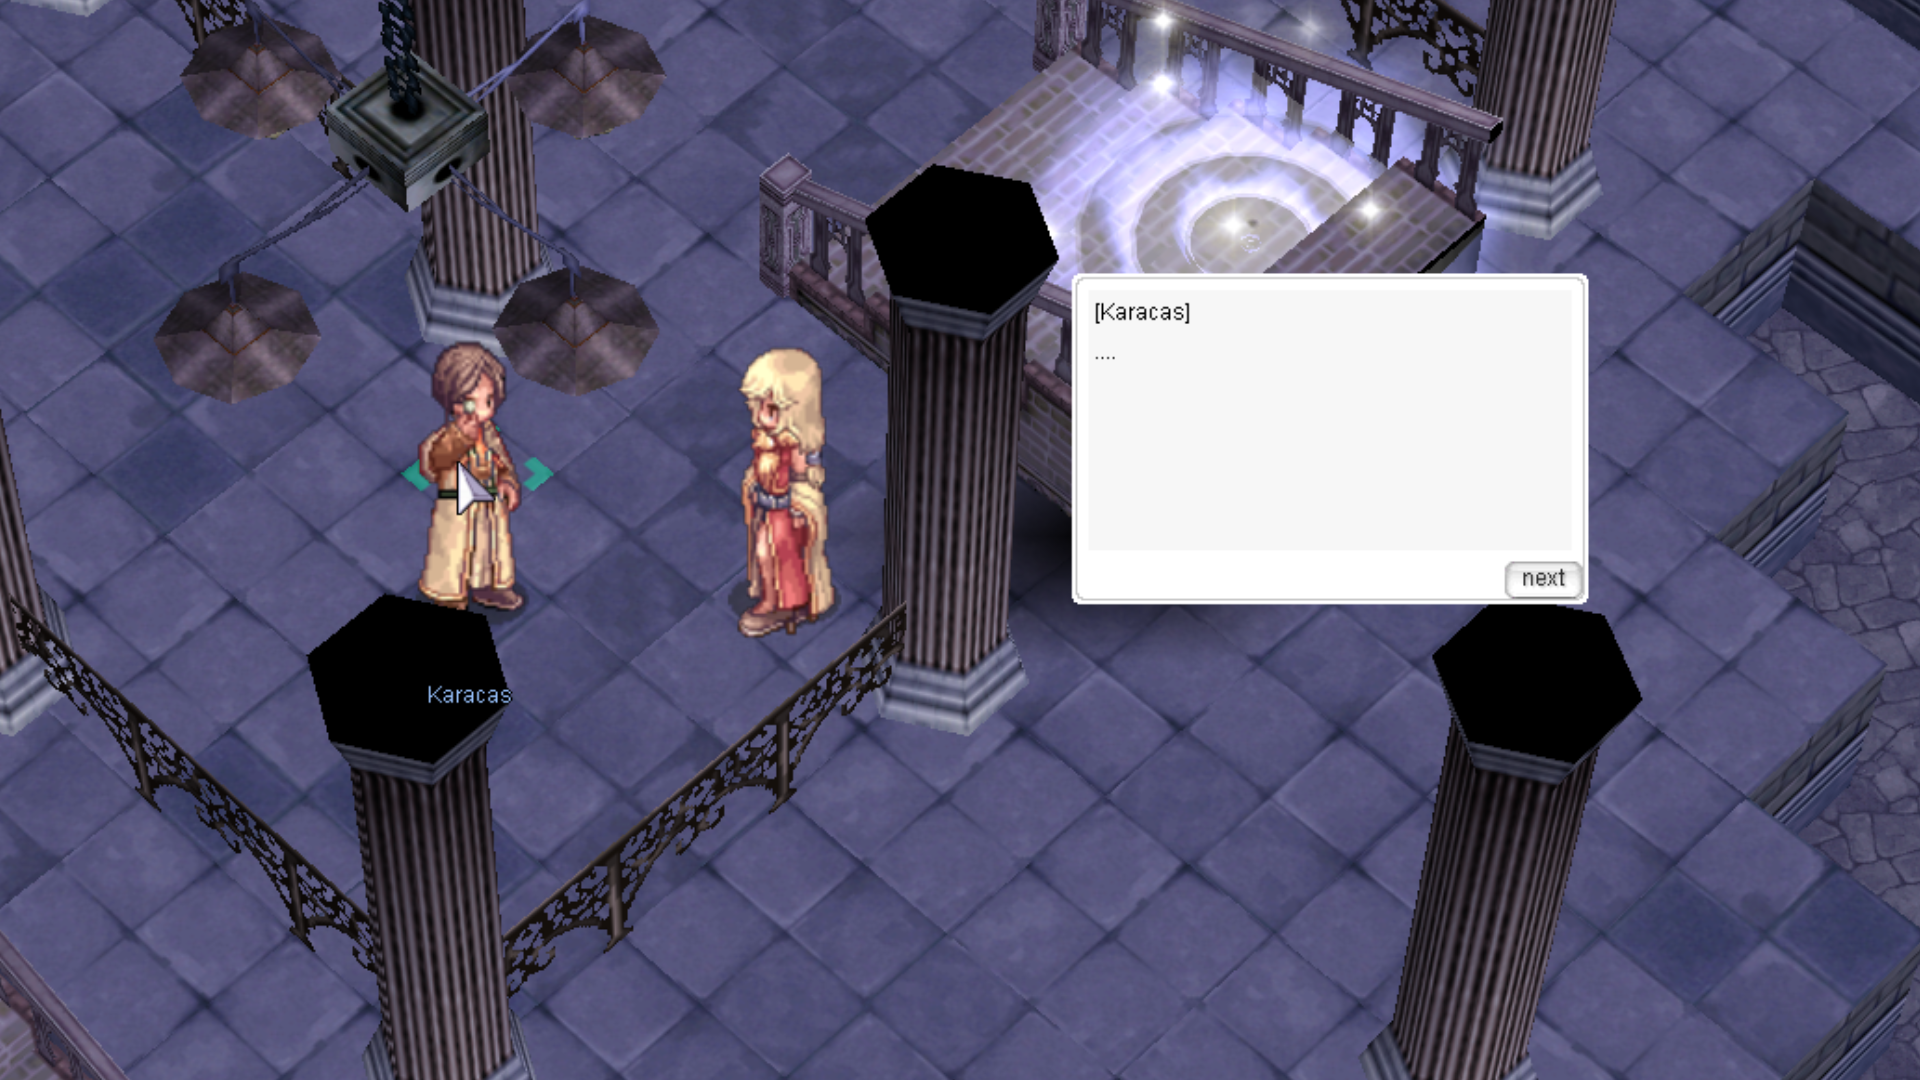
Speak with Merito a second time. Tell him you are skilled in magic and that Sorcerers can handle spirits. Agree to take his test. He will instruct you to go to Karacas on the 4th floor.
-
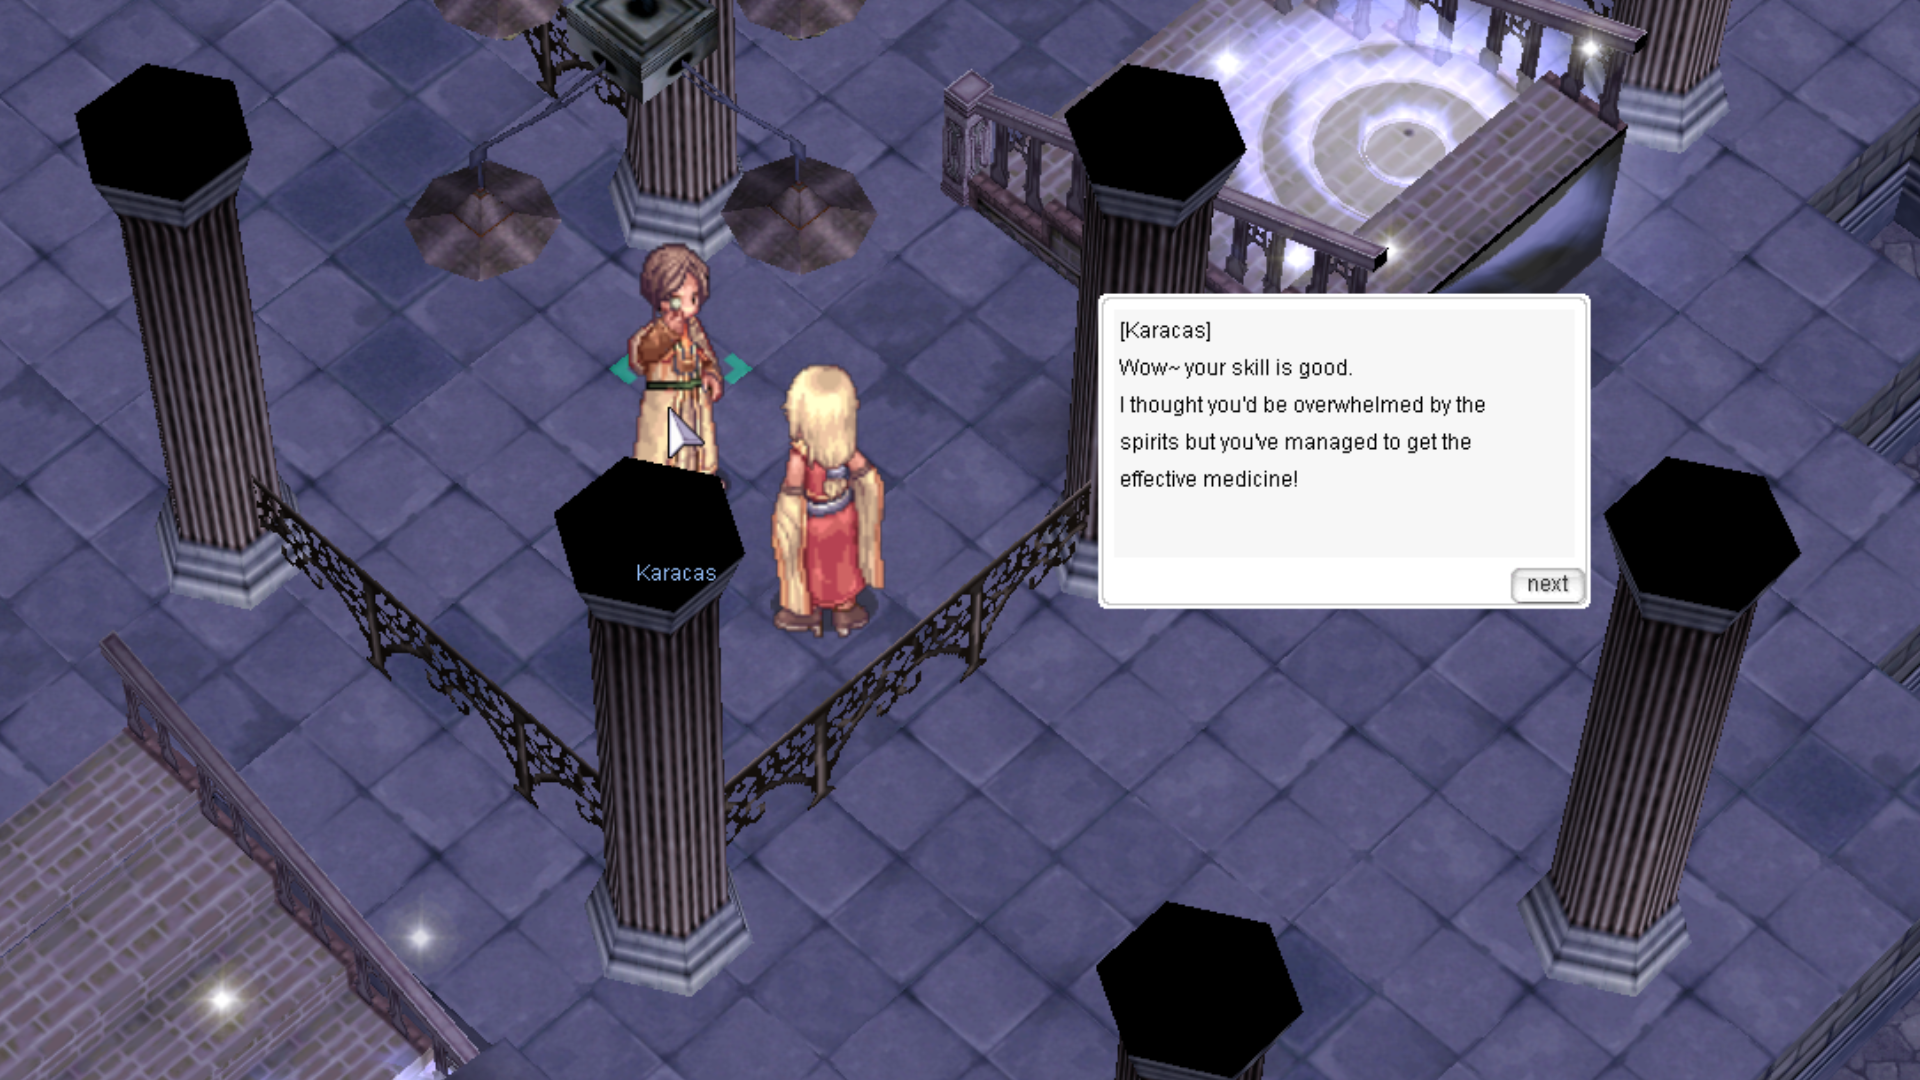
Descend three floors and find Karacas at gef_tower (113,161) in the center of the room. He will tell you that you need 3 Wind of Verdure, 3 Crystal Blues, 3 Red Bloods, and 3 Green Lives to proceed.
-
Return to Karacas with the elemental stones. He will provide the locations where you can interact with the spirits.
-
You need to collect three reagents Red, Clear, and Black at the four designated locations. Each attempt requires three of the corresponding elemental stone. You may need at least 100 elemental stones, as multiple attempts may be required. Some signs can be used multiple times to obtain different reagents.
Locations:
-
Ice Cave 1: Use Crystal Blues at the northeast corner (ice_dun01 274,274) → yields Clear or Black Reagent.

-
Thor Volcano 1: Use Red Bloods at the center of the northwest room (thor_v01 64,252) → yields Clear or Black Reagent.
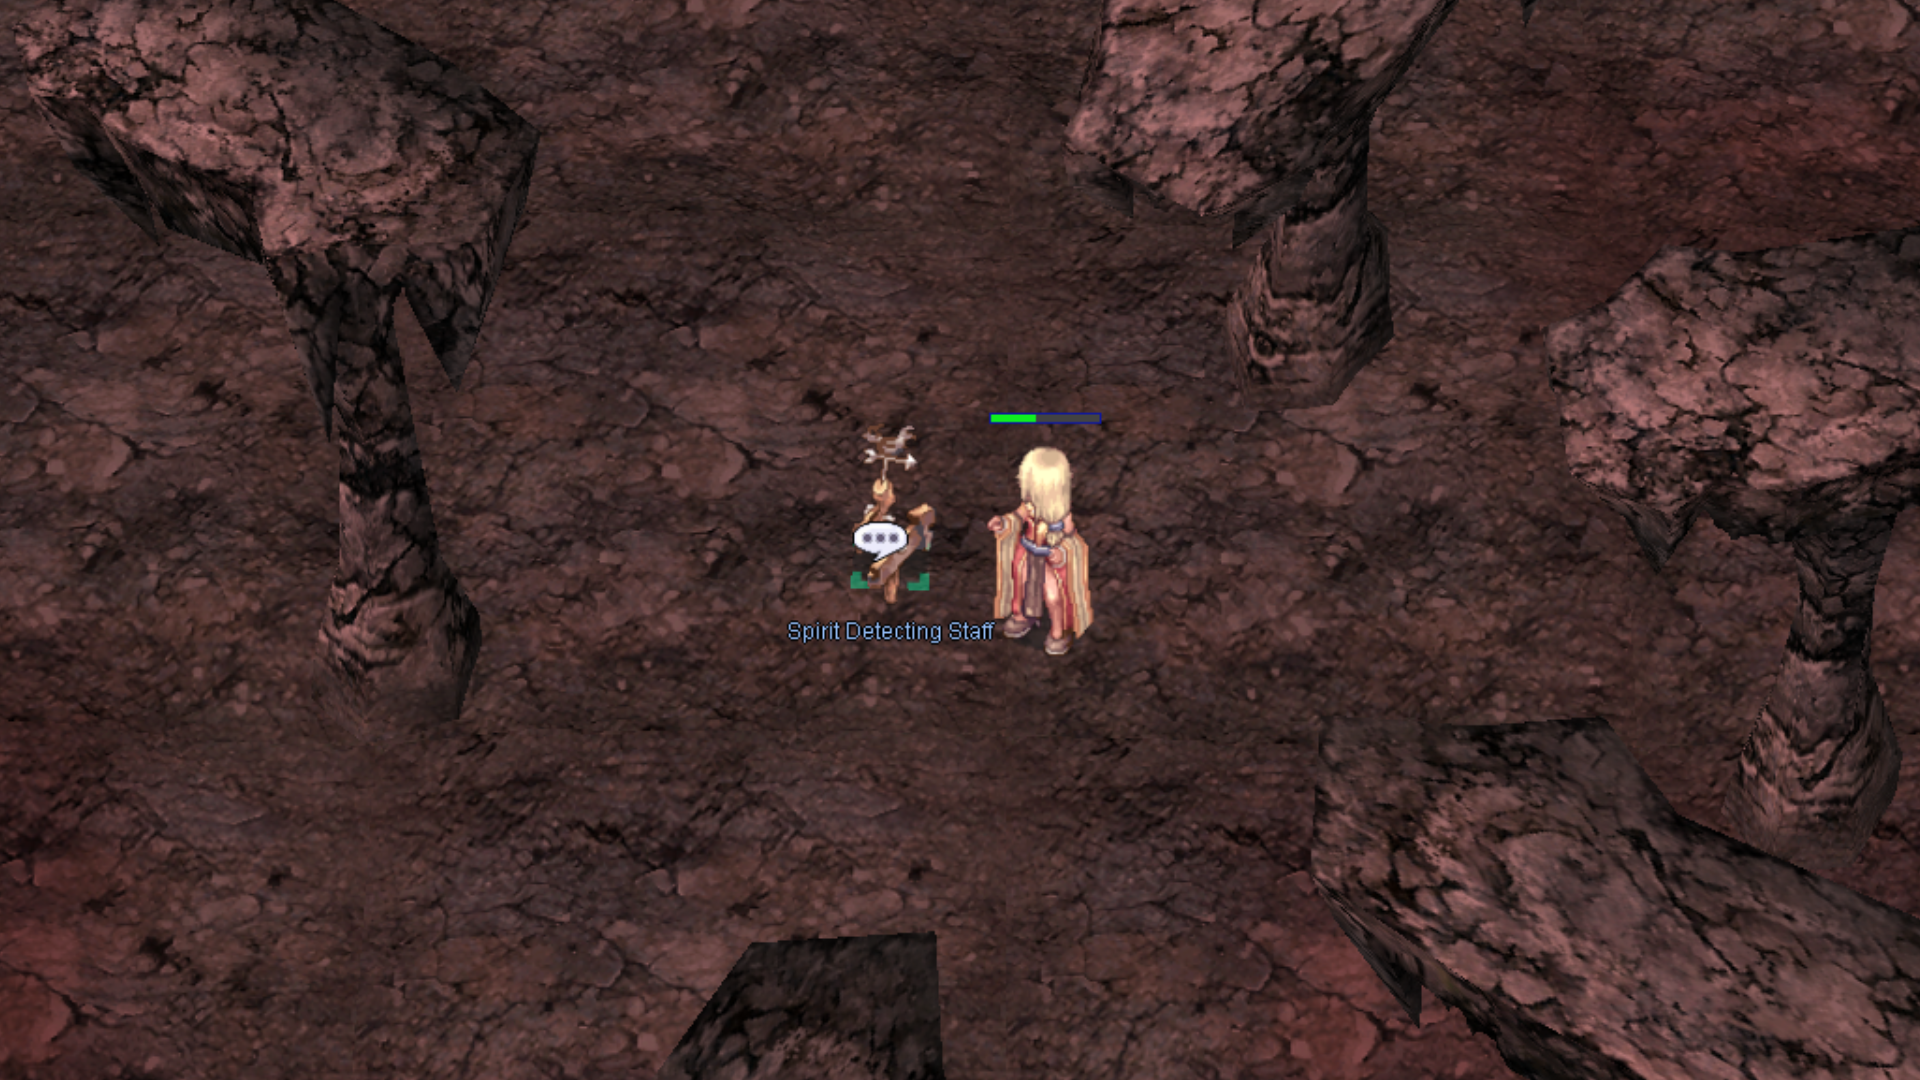
-
Mjolnir Dead Pit 3: Use Green Lives at the southwest part of the northeast island (mjo_dun03 201,141) → yields Red or Clear Reagent.
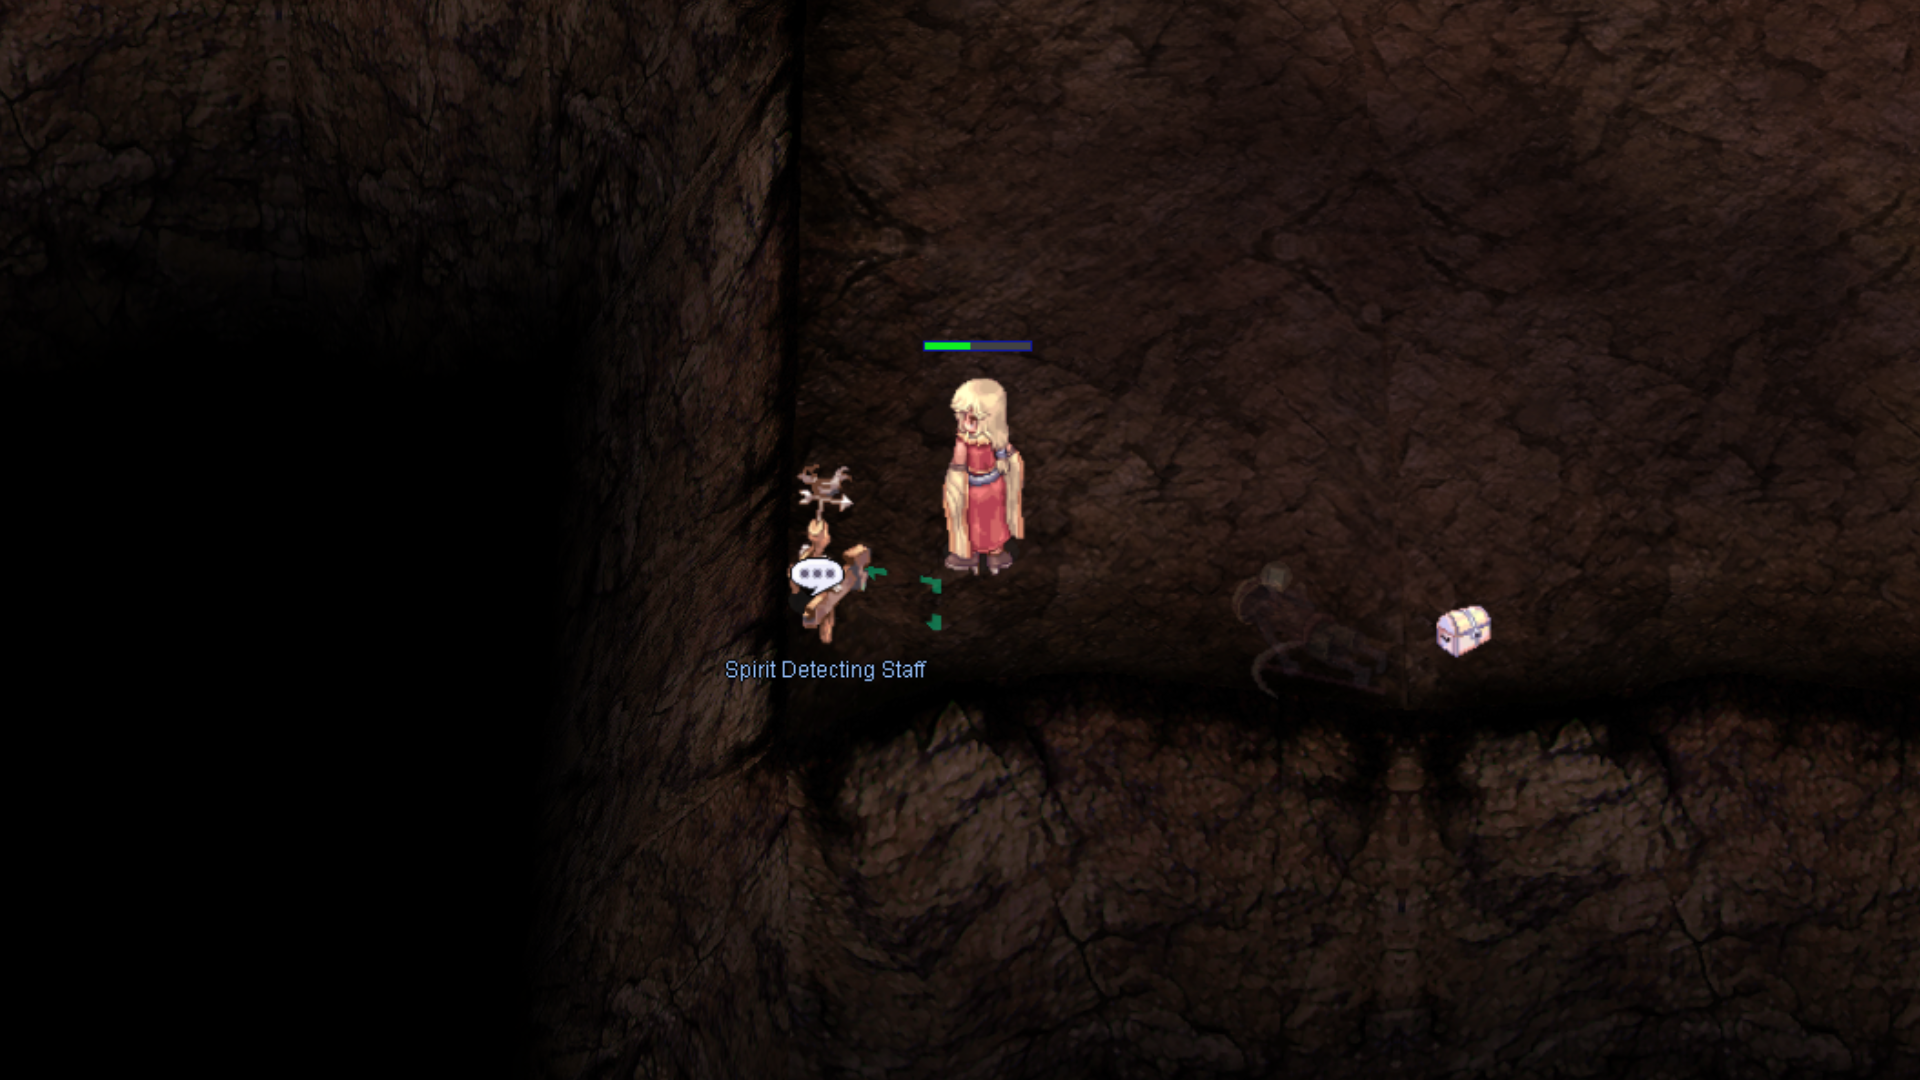
-
Kunlun Dungeon 2: Use Wind of Verdure at the southwest part of the northeast island (gon_dun02 195,190) → yields Red or Black Reagent.

-
-
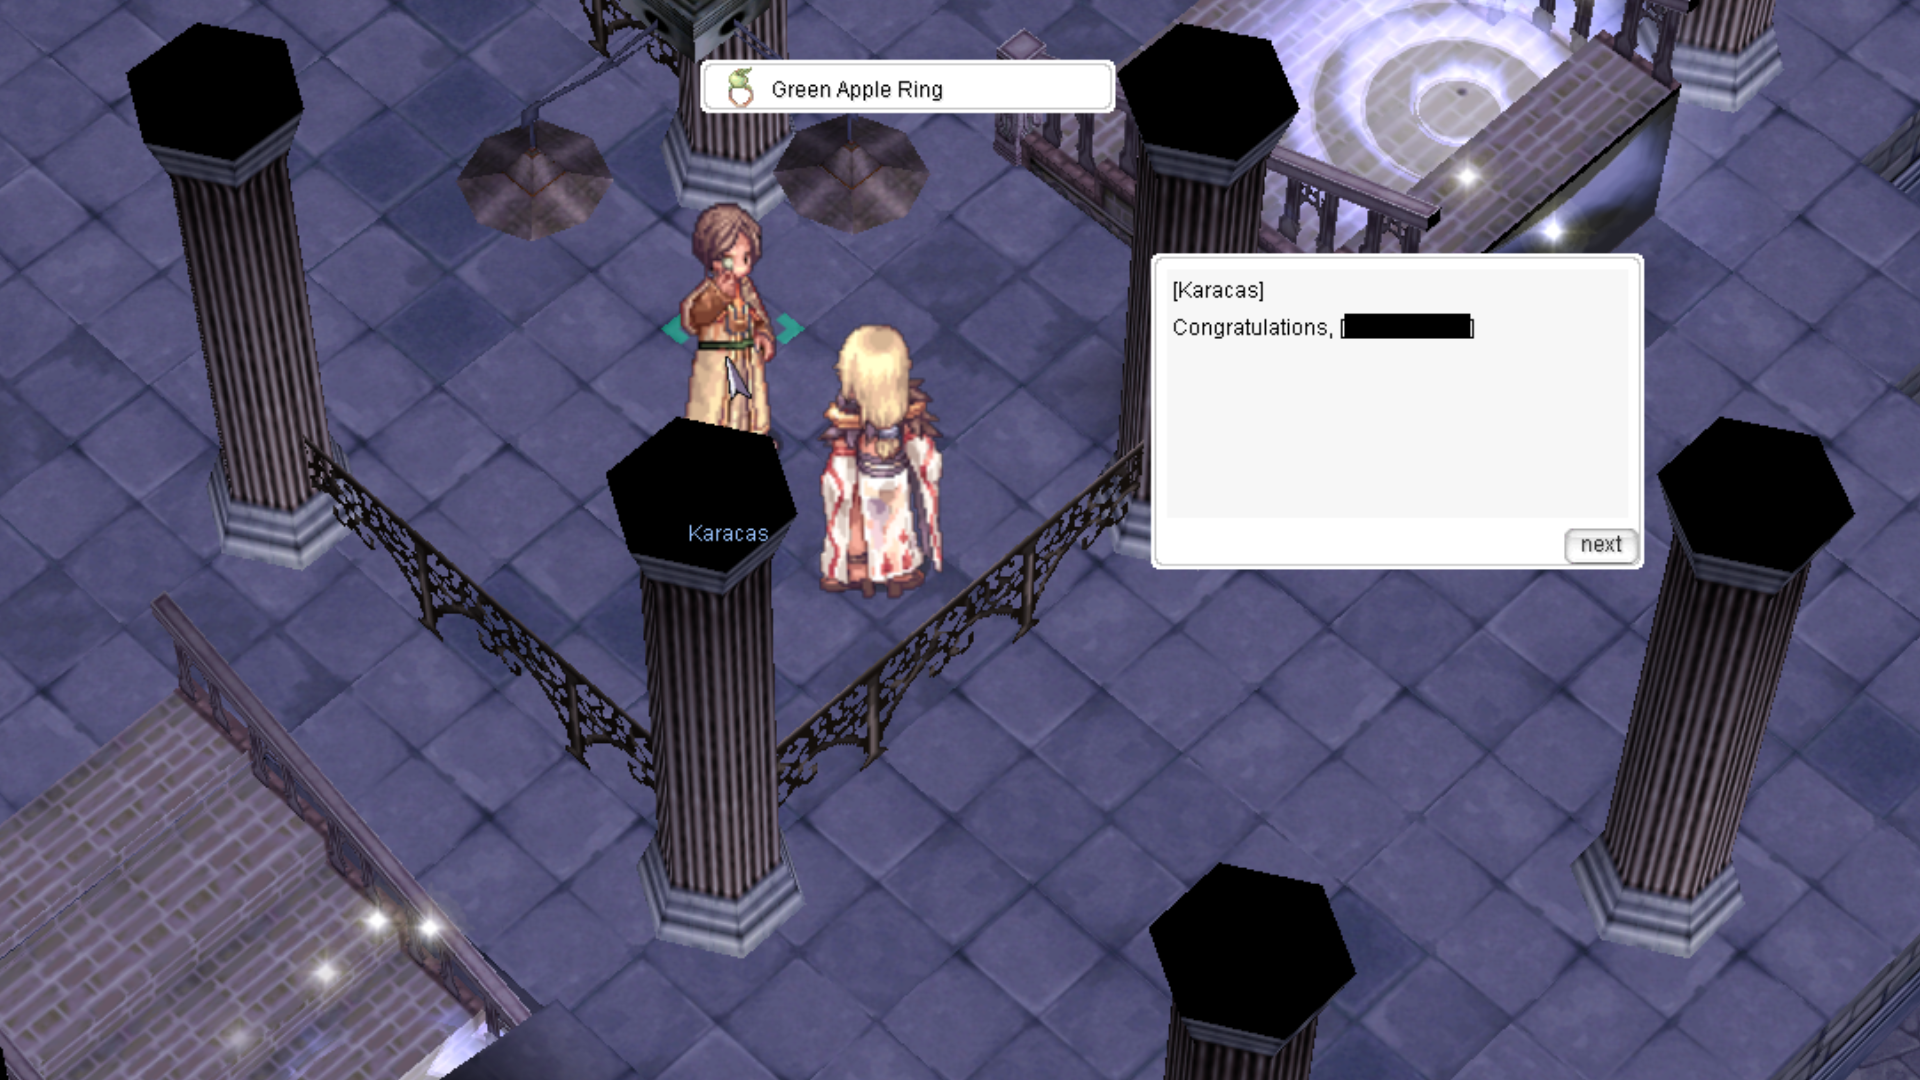
Once you have obtained Red, Clear, and Black Reagents, return to Karacas.
-
Karacas will congratulate you for completing the test and promote you to Sorcerer, awarding:
-
Green Apple Ring
-
Wind Whisper [1]
-
 Arch Bishop
The Arch Bishop is the pinnacle of holy magic and support, combining divine power with advanced healing and protective abilities. They excel at restoring allies, shielding them from harm, and using holy-based offensive spells to smite enemies. Arch Bishops are indispensable in parties, offering both survival and destructive support.
How to Change to Arch Bishop
-
Go to Prontera Sanctuary and speak with Praying Minister at prt_church (103,88). Tell him you want to go on a Holy Pilgrimage. (If you are not VIP, you will need 1 Magical Stone.) He will direct you to visit the priest in Umbala.
-
Speak to Priest Dayan at umbala (139,227) near the Bungee Jump. Tell him, “I’m from Prontera on a pilgrimage” and ask him how to pray.
-
Enter the Yggdrasil Dungeon (umbala 107,285) and make your way to Hvergelmeir’s Fountain. Follow the path: east, then northeast at the first fork, and south at the next fork until reaching yggdrasil01 (219,47).
-
The first part of the prayer is meditation. Enter any text for the second prompt. For the third part, use 1 Holy Water. You will then be warped back to Priest Dayan.
-
Priest Dayan instructs you to visit Vinue, a nun in Hugel.
-
In Hugel Church (hu_in01 205,204), speak to Praying Nun Vinue and ask about her dream. After her explanation, agree to investigate. Pay the Boatman (209,109) 800z to be taken to Odin’s Temple.
-
At Odin’s Temple 2, touch the Valkyrie Illusion (odin_tem02 281,275). If it’s not visible, walk 7–11 cells south of the marker.
-
Speak to the Valkyrie and assist her. She gives you an Ancient Language Scroll to summon a Valkyrie Mercenary and warps you to the job test map.
-
Upon entering the test map, immediately summon the mercenary using the scroll. (If the mercenary dies or isn’t summoned, you will fail this part.) You can also choose to bypass the mercenary and fight manually. If you die, stay in the map—after the timer ends, you’ll return to the job change room.
-
Go to the northwest corner of the map and defeat the Undead Valkyrie. Collect the two Broken Horn Pipes she drops. Use CTRL+R to dismiss your Valkyrie Mercenary.
-
Talk to the spawned Valkyrie (job3_arch02 114,328). She gives a second Ancient Language Scroll and directs you to find the last piece.
-
Summon the new Valkyrie Mercenary and head to the south end of the map. Defeat the Undead Valkyrie and collect the second set of Broken Horn Pipes. Do not dismiss the mercenary this time.
-
Talk to the Valkyrie (job3_arch02 243,49) to reassemble the pieces and go to the shrine at the top of the hill (282,232).
-
At the hilltop, run past the Frus toward the Valkyrie. The Frus will despawn. Be careful—triggering the Valkyrie dialogue incorrectly may disconnect you; if needed, move back and forth to prompt the dialog.
-
Speak to the Valkyrie to complete the job change. You will receive:
-
Mitra [1]
-
Green Apple Ring
 Sura
Sura
The Sura is a master of martial arts and dark energy, combining fast, powerful melee attacks with deadly spiritual techniques. They excel at close-range combat while also using mystical skills to damage multiple enemies or enhance their own abilities. Sura are versatile fighters, blending offense, defense, and utility.
How to Change to Sura
-
Travel to Veins:
-
From Prontera (98,120), speak with Keiki to warp to Juno.
-
In Juno, speak with the Kafra Employee (152,187) to warp to Rachel.
-
In Rachel, talk to Cool Event Corp. Staff (109,138) to warp to Veins.
-
-
Once in Veins, enter the Pub and speak with Sludge Worm (ve_in 241,128). A short cutscene occurs where Sludge and a waitress argue, interrupted by an unknown fighter.
-
Exit the pub and go up the ramp to the upstairs building (veins 127,238). Go inside and talk to Fighter (ve_in 99,159) downstairs. Continue speaking to her until she instructs you to hunt 100 Desert Wolves.
-
After hunting 100 Desert Wolves, return to the Fighter, who reveals herself as Bruno. She will direct you to Buddy, located at the center of El Mes Plateau, Juno Field 7 (yuno_fild07 254,176), who will warp you to the test area.
-
Enter the test room. If someone is ahead of you, you may need to wait.
-
In the test area, waves of monsters spawn, including Injustice, Rybios, Skeleton Prisoners, and Zombie Prisoners, collectively named Phantom. You do not need to kill them.
-
Periodically, additional waves appear, including Ridewords called “Magazine.”
-
Tips:
-
Hide behind the top pillar and attack monsters that approach you.
-
Use Mental Strength to help survive large numbers of enemies.
-
You can use a Token of Siegfried to revive if defeated.
-
-
-
After about 5–6 minutes, Buddy returns, surviving monsters are removed, and he takes you to his Master.
-
Speak with the Master, who accepts you as a Sura and officially changes your job.
-
Blazing Soul [1]
-
Green Apple Ring
 Ranger
Rangers are masters of ranged combat, blending expert marksmanship with nature-based abilities. They excel at long-range physical damage, traps, and supporting allies with tactical skills. Their versatility allows them to control the battlefield from a distance while dealing high sustained damage.
How to Change to Ranger
-
Start with the Survival Instructor
-
Speak to the Survival Instructor near the boat at the Island Entrance (back to Alberta).
-
He will brief you about the job change and check that you are at base level 99.
-
You must remove all equipment and reduce your weight to 0 (zeny does not count).
-
You will then be warped back to Alberta. Return and talk to the instructor again.
-
-
First Test – Reaching Test Instructor Teardrop
-
You will be given 1 Bow, 500 Arrows, and 10 Novice Fly Wings.
-
Head to Test Instructor Teardrop (tur_dun01 91,168) at the northwest tip of the island.
-
Make sure to drop all items in your inventory except those provided; otherwise, you will be marked cheating.
-
Talk to Teardrop and choose “I came here for the test.”
-
Your first mission is to kill 1 Dragon Tail and return with 1 Wing of Dragonfly.
-
Your falcon can assist if you run out of arrows.
-
-
Second Test – Poring Hunt (Accuracy & Targeting Test)
-
You will be warped to a test area and given 100 Arrows (you will receive 100 more if you fail and retry).
-
Kill Poring-class monsters (Poring, Marin, Poporing, Drops). Only the correct “Poring” counts.
-
Locations based on monster name:
-
Poring → North (12 o’clock)
-
Podaegi → Northeast (↗)
-
Poporing → East (→)
-
Poja → Southeast (↘)
-
Pororing → South (↓)
-
Drops → Southwest (↙)
-
Hoing → West (←)
-
Poing → Northwest (↖)
-
-
Passing score: 15 out of 20.
-
-
Third Test – Plant Trap Test (Bombring)
-
NPC gives 10 Bombring capsules, 100 Novice Potions, and 2k+ report files (weight goes to 90%).
-
Use Bombring capsules to destroy plant monsters: Floras, Geographers, Nepenthes, Drosera, Muscipulars, Mandragoras, Parasites.
-
Bombring mechanics: spawns a Bombring, attacks for 1 second, explodes after 3 seconds in a 5×5 area. Avoid standing too close.
-
You may also use leftover arrows on plants for easier navigation.
-
Deliver all report files and complete all Bombring placements to reach Test Supervisor Kowsyun.
-
You will then be warped to the 4th test area.
-
-
Fourth Test – Baby Desert Wolf Mercenary Test
-
Supervisor gives 1 Job Change Flute to summon a Baby Desert Wolf mercenary.
-
Under Stone Curse, you must control the mercenary to disarm 20 Egg Bombs appearing randomly.
-
Passing score is 10 out of 20.
-
-
Job Change Completion
-
After passing all tests, return to the Ranger Master.
-
He will check that all skill points are consumed and ensure your falcon is removed.
-
Rewards:
-
Sniper Goggle [1]
-
Green Apple Ring
-
Wolf Flute
-
-
 Minstrel
Minstrels are the ultimate support performers, using music to strengthen allies and weaken enemies. They excel in party buffs, area-of-effect attacks, and strategic control during battles.
How to Change to Minstrels
1. Starting the Quest
-
Go immediately south of the boat in Alberta and talk to the Bard (alberta 196/133).
-
Offer to help him find “Minstrel Song.” He instructs you to look around Prontera.
2. Initial Investigations in Prontera
-
Speak to the Warmhearted Woman near the center Kafra (prontera 141/97). She directs you to someone near Prontera Castle.
-
Just west of Prontera Castle, talk to the Glasses-Wearing Man (prontera 140/331). He sends you to a woman in front of the Tool Shop.
-
At the Tool Shop (prontera 146/218), talk to the Woman. She doesn’t help much; return to Alberta.
-
Speak to the Bard again. He mentions “Minstrel Song” went to Hugel long ago. You’ll take the Airship since the sea route is unavailable.
3. Traveling to Hugel
-
Take the Juno-Hugel (Domestic) Airship.
-
Speak to the Karian in the northwest corner (airplane 222/67) to be warped to an inn in Hugel.
-
Talk to Karian again, who recommends visiting the pub.
-
Enter the pub in southeast Hugel (hugel 127/65) and speak to the Tone-deaf Person.
-
Return to the inn and inform Karian that “Minstrel Song” is headed for Thanatos Tower. He will accompany you.
Tip: The path to Thanatos Tower is extremely dangerous for a solo level 99 Minstrel. Recommended methods:
Have friends escort you from Hugel.
Use teleport/flywing from Aldebaran to bypass dangerous fields.
Stock up on at least 100 Fly Wings for safety.
-
Speak to the Tower Keeper (hu_fild01 143/162) to teleport to Thanatos Tower entrance.
-
Near the portal (upper left side of map), pick up a piece of paper on the ground.
4. Investigating “Minstrel Song”
-
Go to Juno and talk to Mr. Click (yuno 143/170) to receive a photo of Minstrel Song.
-
The back of the photo instructs you to hunt 33 Teddy Bears. Recommended hunting spot: ein_fild03.
-
Speak to the Little Girl (lighthalzen 162/126) in front of Lighthalzen Hotel. She says “Minstrel Song” went to the Ice Dungeon.
5. Ice Dungeon
-
Ice Dungeon is located east of Rachel; go out the east exit and up 3 maps. Entrance is at the top of the map with Desert Wolves.
-
Explore Ice Dungeon 01 and read the poem on the wall. NPCs will teleport you through spots as you read each line.
-
Speak to the Old Woman after waking; she says “Minstrel Song” went to Comodo.
-
Travel south via the Veins dock and take a boat/kayak to Comodo.
Warning: The southern Veins dock is extremely dangerous due to plant spawns (Drosera, Muscipulars). Clear the area before proceeding.
6. Comodo
-
Speak to the Kayak Master (comodo 192/119), who suggests visiting the diner.
-
Speak to the Woman Roasting Meat (comodo 159/316). She says “Minstrel Song” went southeast of Morroc, near the Assassin Guild.
-
Along the way to the Assassin Guild (moc_fild16 205/231), pick up a sheet of paper. Karian instructs you to visit the Clock Tower in Aldebaran.
7. Clock Tower & Final Steps
-
At the Clock Tower, Karian sings a song from his friend. Then he suggests returning to Prontera.
-
Near south Prontera Kafra (prontera 157/39), speak to Karian. You will be warped to a small room.
-
Speak to Maestro Karian (prt_in 94/172) inside the room. He reveals himself as Minstrel Song and completes your job change to Maestro.
-
Minstrel Song Hat
-
Green Apple Ring
-
 Wanderer
Wanderer is a female performer specialized in support, debuffs, and ranged AoE attacks. She enhances parties with unique buffs that reduce SP costs and restore SP, making her invaluable for SP-dependent skills and low-INT builds. With access to MATK weapons and disabling abilities
How to Change to Wanderer
-
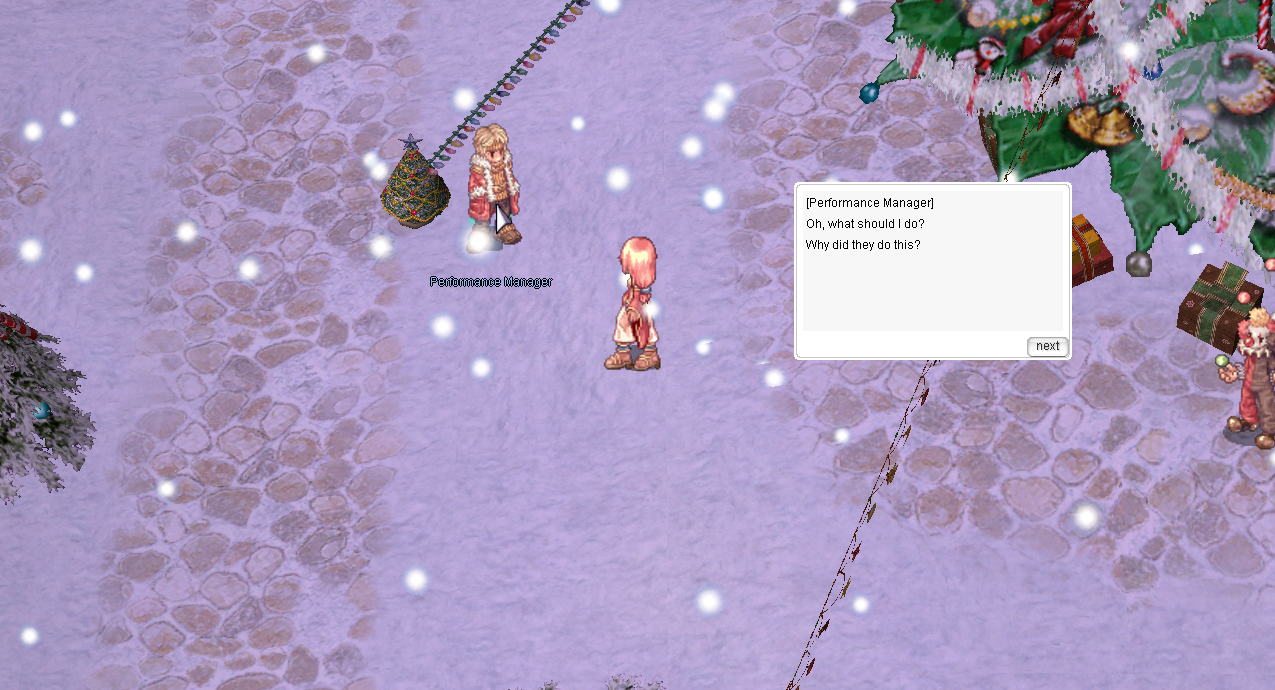
In Lutie, speak to an Aspiring Wanderer south of Santa’s house.

-
Help the Performance Manager by speaking with Song Guitar in Comodo about the canceled show.
-
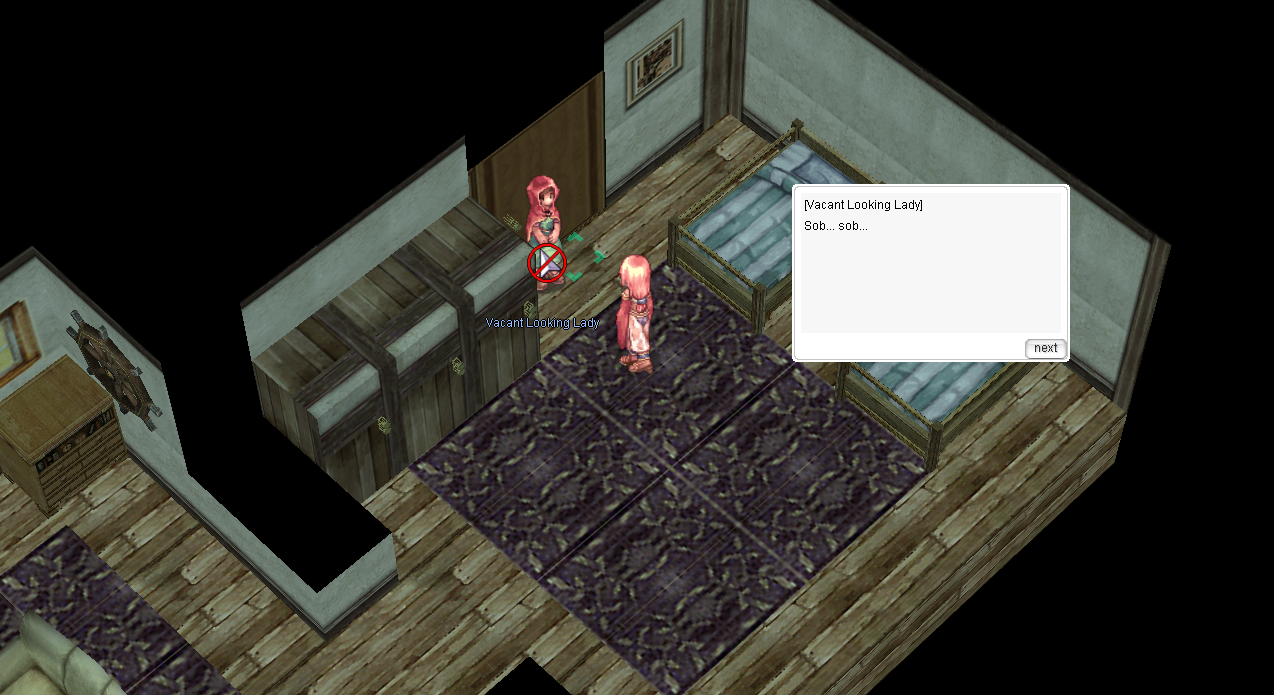
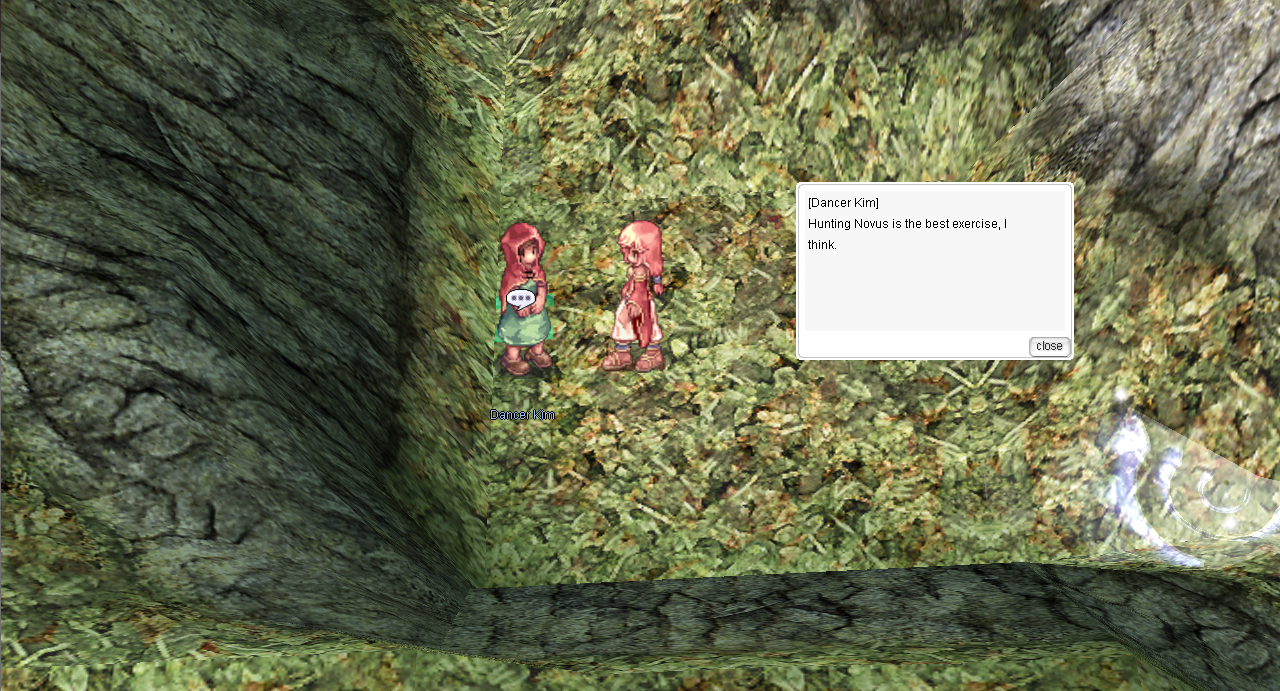
In Comodo, talk to the Cheerless Minstrel on the balcony; use Kiss of Fortune (Lady Luck) to get information about Dancer Kim in Hugel.

-
In Hugel, encourage Kim and meet her at Abyss Lake. She will give a timed quest to kill 50 Novus (Yellow).
-
Return to Comodo to inform Guitar Song that the performance is back.
-
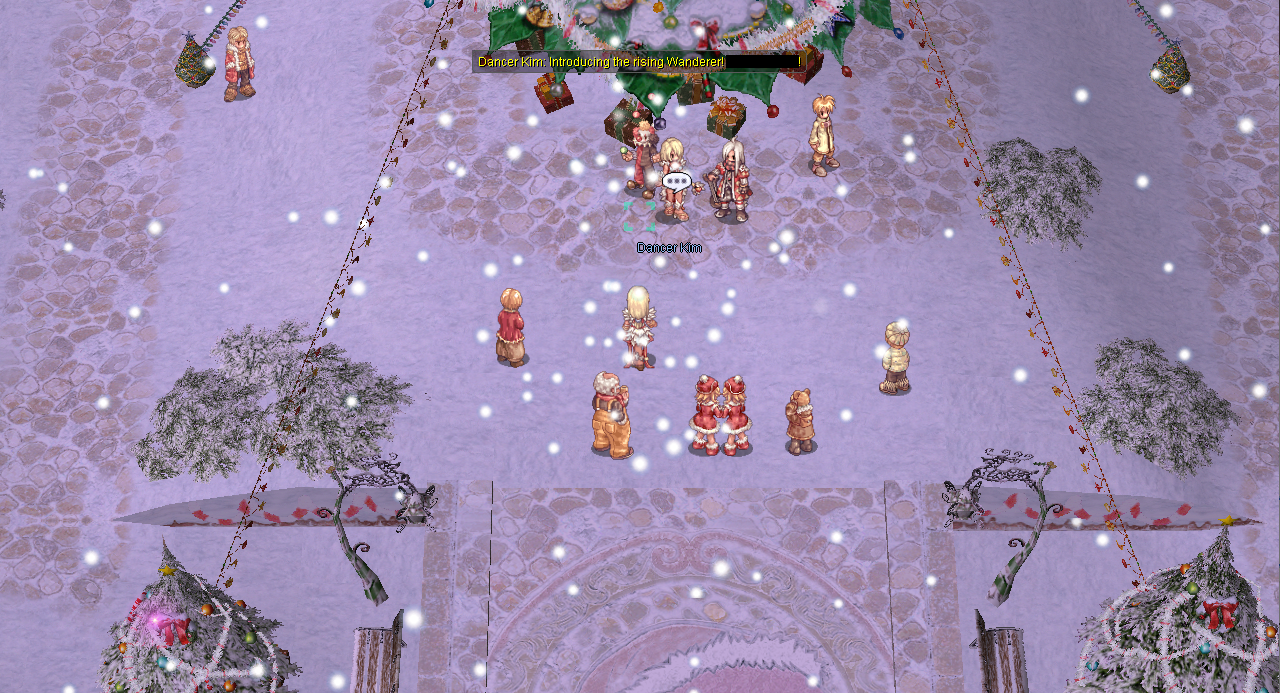
Go back to Lutie and approach the Christmas tree to start the show. After talking to Kim, you are changed to Wanderer.
-
Green Apple Ring
-
Dying Swan [1]
 Guillotine Cross
Guillotine Cross is focuses on high burst damage, poison, and critical attacks. while gaining advanced assassination techniques. They can also craft powerful poisons that are highly effective and difficult for other classes to resist.
How to Change to Guillotine Cross
- Visit the Morroc secret tavern (morocc 45/107) and talk to the Guild Staff near the bar. Go to Veins and visit the Guillotine Cross Assassin Guild headquarters (veins 254/255). Talk to Daora and select “…”. Go through the portal at the bottom right and enter the left portal in the next room. Talk to Mayshell. Return to Daora in the main hall, select “Come on, just one glass.” twice, then “I need help.”
2. Gather information from the 3 NPCs:
-
Vigilante (veins 291/214) → “Do you have a colleague named Troban?”
-
Young Merchant (veins 230/162) → “Do you know Krave?”
-
Bar Employee (veins 148/216) → “You…”
For the final review, select “Do it.”, “They have no address.”, and “But Madelle saw two people.”.
3. Gather information from 5 more NPCs:
-
Vigilante (291/214) → “Have you seen some wanted criminals or something?”
-
Old Villager (231/125) → “You’re not that old.”
-
Peddler (184/142) → “Yes?”
-
Young Merchant (230/162) → “I’ve heard you never forget a face.” → “I’m looking for my runaway cousin.” → “Yes.”
-
Bar Employee (148/216) → “What do you have?” → “Sure.”
-
Girl (226/180) → “How do you know?” → “Yes. Can you find her?” → “Woman” → “Yellow” → “Young Adult”
4. Go to veins 341/286 at the time specified in your quest log to trigger the NPC. If you fail, wait 5 minutes and try again. Return to Daora and select any dialogue option. Enter the right portal, then the right portal in the corridor, and talk to Estillda → “Are you okay?”.
5. At veins 206/55 at the time specified, trigger an NPC dialogue. You will be warped into a room with an NPC who will attack you. Kill him, click the corpse to receive a key, then click again to return to Veins. Recommended: use Enchant Deadly Poison and bring potions.
6. Go to Rachel (rachel 61/37) and talk to Oresa Rava. Return to Mayshell at the guild in Veins.
For the GX NPC mission:
-
Option 1: Veins Field 5 (328/308) → Top-right corner of the map
-
Option 2: Veins Field 2 (330/384)
-
Find a gap near the fence, crawl through, cloak to avoid guards/dogs. You have 10 minutes to finish the mission.
Enter the back door of the mansion. Talk to the NPC, who will attack you. Enemies include Watchdog, Watch Horong, Guard, and Vanished Priest. Kill the NPC and return to Veins. Only one player may enter at a time; cooldown 10 minutes if needed.
7. Talk to Mayshell to receive a grade (A–F). Go to the room on the right, talk to Bercasell, and select the option to become a Guillotine Cross.
-
Green Apple Ring
-
Jewelry Box
-
Silent Executioner
 Shadow Chaser
Shadow Chasers, They excel at stealth and deception, using body paint and other tools to detect cloaked enemies, turn fully invisible, and apply debuffs. They can also hide in an enemy’s shadow to redirect damage and can mimic certain skills from other classes, making them highly versatile and formidable
How to Change to Shadow Chasers
Step 1: Speak to the Girl in Morroc (156/70). She will tell you about Shadow Chasers and direct you to the Rogue Guild.
Step 2: Go to the Rogue Guild (cmd_fild07 196/117). On the lower floor, speak to the Scary Man (in_rogue 379/101) in the southeast room. He will explain an encryption method and give you a code.
Step 3: Decipher the code using the table provided. (2023 answer: SHADOWS ATELIER IN PRONTERA)
Step 4: Head to Prontera and enter the building in the southeast. Speak to Manager Graham (s_atelier 65/120). Show him the deciphered code and agree to try breaking in. Solve the cipher he gives to obtain the Key of Deception.
Step 5: Return to Graham and follow instructions to go to Rachel. Speak to the Manager (s_atelier 168/65) and follow his codes to reach Ice Dungeon 2. Talk to the Red Flame (ice_dun02 206/223) and hunt the Shadow of Illusion (Skogul). Solve the cipher to get the Key of Illusion.
Step 6: Return to Rachel Manager with the Key of Illusion. He sends you to Manager Haled in Juno (yuno 278/67). Speak to him, then head to Niflheim. Speak to the Red Flame (niflheim 231/275) and hunt the Shadow of Pleasure (Succubus). Solve the number puzzle to receive the Key of Pleasure.
Step 7: Return to Manager Haled, then go to Manager Vicente in Lighthalzen (41/55). Show him all three keys. He instructs you to go to Thanatos Tower.
Step 8: From Juno: travel south 1 map → east 1 map → north 2 maps → Thanatos Tower. At the north half of Thanatos Tower, enter the portal (tha_t01 149/224) and place the keys in the statue to receive A Master’s Brush.
Step 9: Return to Manager Vicente, go upstairs, and speak with Dumk (70/66) to complete your job change to Shadow Chaser.
-
Paint Brush
-
Makeover Brush
-
Shadow Handicraft
-
Green Apple Ring
.
Special Way to Advance 3rd Classes Faster with 3rd Class Pass Ticket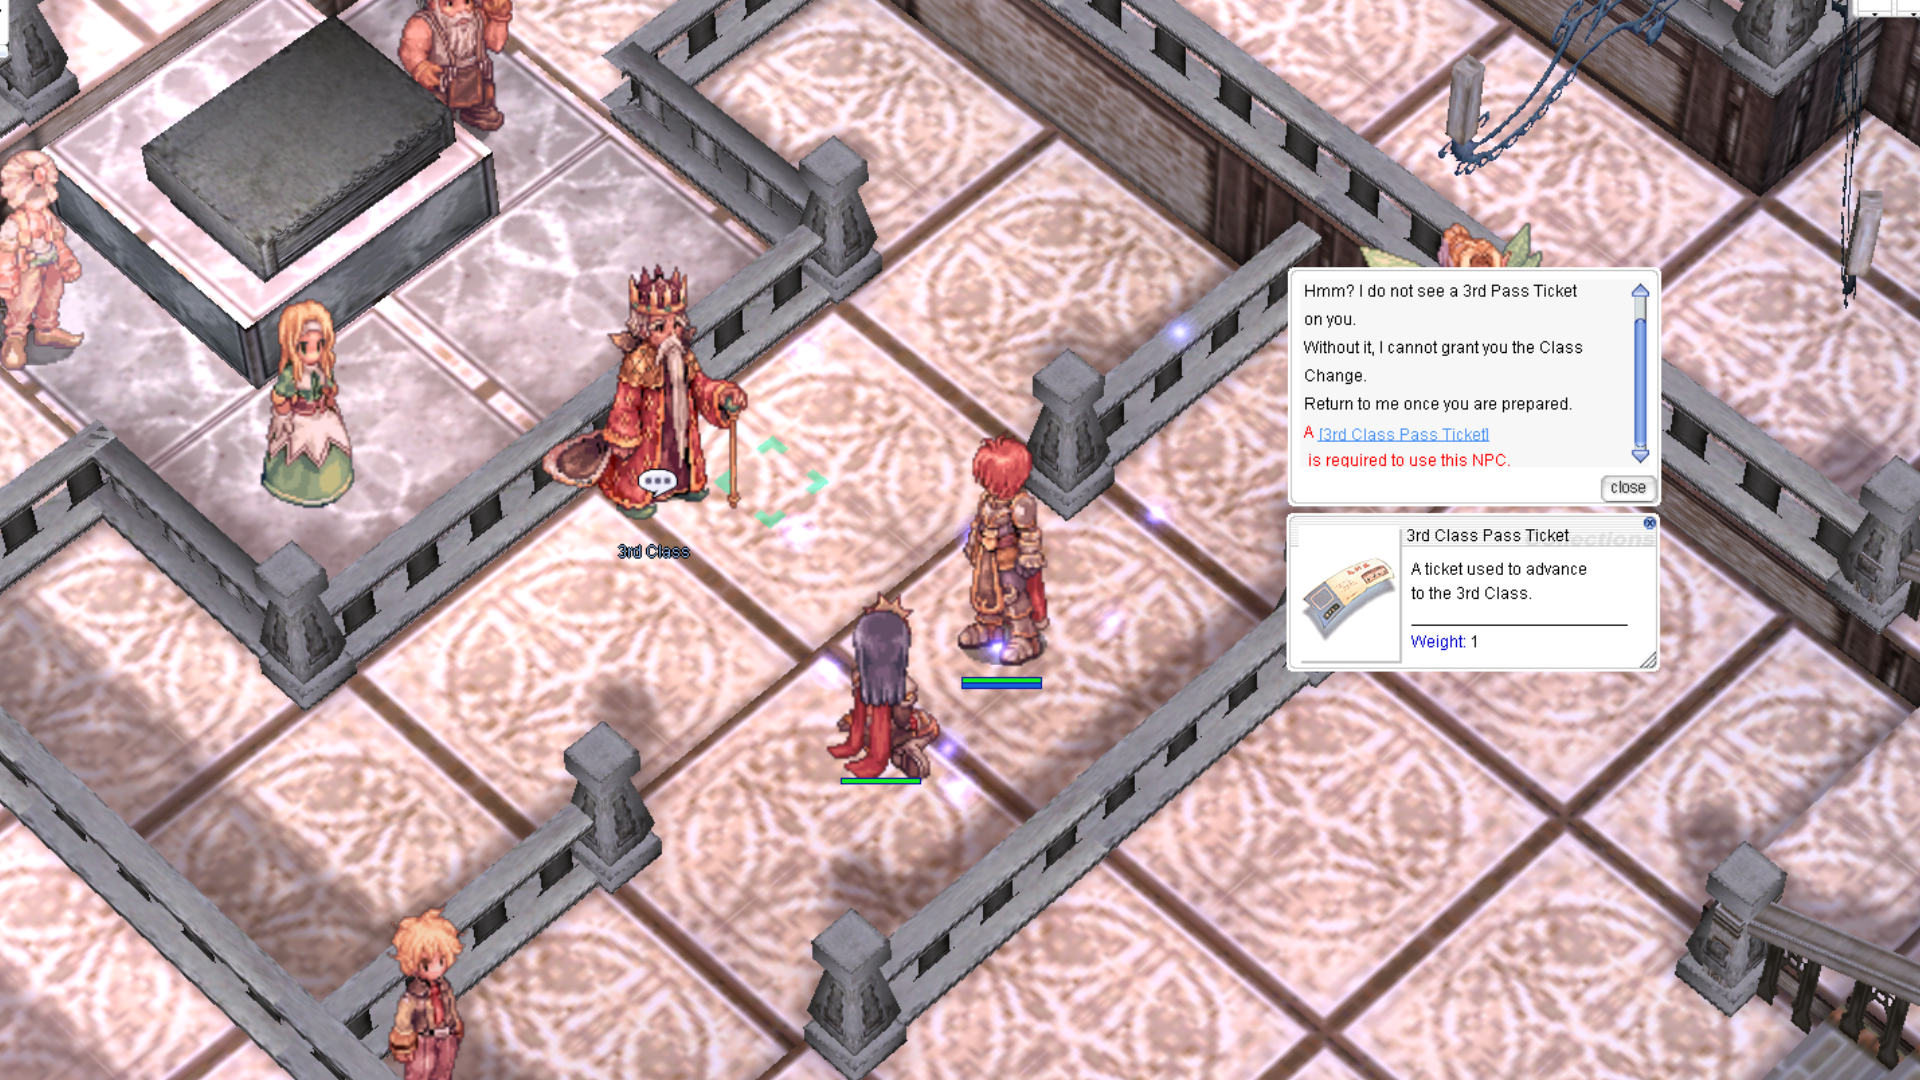
– Base Level 125
– Job Level 70
– Allocate all status points
– Maximize all skills
– Check weight: 800
– Unequip Peco Peco, Cart, and Mount/Bird